Loading...
Loading...
Loading...
Loading...
Loading...
Loading...
Loading...
Loading...
Loading...
Loading...
Loading...
Loading...
Loading...
Loading...
Loading...
Loading...
Loading...
Loading...
Loading...
Loading...
Loading...
Loading...
Loading...
Loading...
Loading...
Loading...
Loading...
Loading...
Loading...
Loading...
Loading...
Loading...
Loading...
Loading...
Loading...
Loading...
Loading...
Loading...
Loading...
Loading...
Loading...
Loading...
Loading...
Loading...
Loading...
Loading...
Loading...
Loading...
Loading...
Loading...
Loading...
Loading...
Loading...
$ docker run --name ome -d -e OME_HOST_IP=Your.HOST.IP.Address \
-p 1935:1935 -p 9999:9999/udp -p 9000:9000 -p 3333:3333 -p 3478:3478 -p 10000-10009:10000-10009/udp \
airensoft/ovenmediaengine:latest$ docker logs ome -f
[2023-03-06 08:01:24.810] I [OvenMediaEngine:1] Config | config_manager.cpp:239 | Trying to set logfile in directory... (/var/log/ovenmediaengine)
[2023-03-06 08:01:24.810] I [OvenMediaEngine:1] Config | config_manager.cpp:261 | Trying to load configurations... (origin_conf/Server.xml)
[2023-03-06 08:01:24.816] I [OvenMediaEngine:1] OvenMediaEngine | banner.cpp:23 | OvenMediaEngine v0.15.1 () is started on [ab3995acafd4] (Linux x86_64 - 5.13.0-44-generic, #49~20.04.1-Ubuntu SMP Wed May 18 18:44:28 UTC 2022)
...$ docker ps -f name=ome
CONTAINER ID IMAGE COMMAND CREATED STATUS PORTS NAMES
c9dd9e56d7a0 airensoft/ovenmediaengine:latest "/opt/ovenmediaengin…" About a minute ago Up About a minute 0.0.0.0:1935->1935/tcp, :::1935->1935/tcp, 80/tcp, 0.0.0.0:3333->3333/tcp, :::3333->3333/tcp, 3334/tcp, 8080/tcp, 0.0.0.0:3478->3478/tcp, :::3478->3478/tcp, 4000-4005/udp, 8090/tcp, 0.0.0.0:9000->9000/tcp, :::9000->9000/tcp, 10010/udp, 0.0.0.0:9999-10009->9999-10009/udp, :::9999-10009->9999-10009/udp ome$ docker run -d -p 8090:80 airensoft/ovenplayerdemo:latest<CrossDomains>
<Url>*</Url>
<Url>*.airensoft.com</Url>
<Url>http://*.ovenplayer.com</Url>
<Url>https://demo.ovenplayer.com</Url>
<Header>
<Key>Access-Control-Expose-Headers</Key>
<Value>Date, Server, Content-Type, Content-Length</Value>
</Header>
<Header>
<Key>custom-header</Key>
<Value>airensoft</Value>
</Header>
</CrossDomains>


ChainCertPath<Bind>
<!-- For API Server -->
<Managers>
<API>
<Port>8081</Port>
<TLSPort>8082</TLSPort>
<WorkerCount>1</WorkerCount>
</API>
</Managers>
<!-- For Providers -->
<Providers>
<WebRTC>
<Signalling>
<Port>3333</Port>
<TLSPort>3334</TLSPort>
<WorkerCount>1</WorkerCount>
</Signalling>
...
</WebRTC>
</Providers>
<!- For Publishers -->
<Publishers>
<LLHLS>
<Port>80</Port>
<TLSPort>443</TLSPort>
</LLHLS>
<WebRTC>
<Signalling>
<Port>3333</Port>
<TLSPort>3334</TLSPort>
</Signalling>
...
</WebRTC>
</Publishers>
</Bind><!-- For API Server -->
<Managers>
<Host>
<Names>
<Name>*</Name>
</Names>
<TLS>
<CertPath>path/to/file.crt</CertPath>
<KeyPath>path/to/file.key</KeyPath>
<ChainCertPath>path/to/file.crt</ChainCertPath>
</TLS>
</Host>
...
</Managers>
<VirtualHosts>
<VirtualHost>
<!-- For Vitual Host -->
<Host>
<Names>
<Name>*</Name>
</Names>
<TLS>
<CertPath>/etc/pki/airensoft.com/_airensoft_com.crt</CertPath>
<KeyPath>/etc/pki/airensoft.com/_airensoft_com.key</KeyPath>
<ChainCertPath>/etc/pki/airensoft.com/_airensoft_com.ca-bundle</ChainCertPath>
</TLS>
</Host>Content-Type: application/jsonAuthorization: Basic {credentials}
# Authorization
Credentials for HTTP Basic Authentication created with <AccessToken>{}WWW-Authenticate: Basic realm=”OvenMediaEngine”{
"statusCode": 200,
{
"message": "[HTTP] Authorization header is required to call API (401)",
{
"statusCode": 404,
"message": "Could not find the application: [default/non-exists] (404)"
}<Server>
...
<Bind>
<Providers>
<RTMP>
<Port>1935</Port>
</RTMP>
</Providers>
</Bind>
...
<VirtualHosts>
<VirtualHost>
<Application>
<Providers>
<RTMP>
...
</RTMP>
...
</Providers>
<Application>
</VirtualHost>
</VirtualHosts>
</Server><Application>
<Providers>
<RTMP>
<BlockDuplicateStreamName>true</BlockDuplicateStreamName>
</RTMP>
</Providers>
<Application><Server version="...">
...
<P2P>
<MaxClientPeersPerHostPeer>2</MaxClientPeersPerHostPeer>
</P2P>
...
</Server>sudo apt-get update
cd OvenMediaEngine-master/src
make release
sudo make install
systemctl start ovenmediaengine
# If you want automatically start on boot
systemctl enable ovenmediaengine.service sudo dnf update
cd OvenMediaEngine-master/src
make release
sudo make install
systemctl start ovenmediaengine
# If you want automatically start on boot
systemctl enable ovenmediaengine.servicesudo dnf update
cd OvenMediaEngine-master/src
make release
sudo make install
systemctl start ovenmediaengine
# If you want automatically start on boot
systemctl enable ovenmediaengine.serviceContent-Type: application/jsonAuthorization: Basic {credentials}
# Authorization
Credentials for HTTP Basic Authentication created with <AccessToken>{
"message": "OK",
"statusCode": 200
}
# statusCode
Same as HTTP Status Code
# message
A human-readable description of the response codecurl -LOJ https://github.com/AirenSoft/OvenMediaEngine/archive/master.tar.gz && \
tar xvfz OvenMediaEngine-master.tar.gz && \
OvenMediaEngine-master/misc/prerequisites.shsudo dnf update
cd OvenMediaEngine-master/src
make release
sudo make install
systemctl start ovenmediaengine
# If you want automatically start on boot
systemctl enable ovenmediaengine.service$ sudo firewall-cmd --add-port=3333/tcp
$ sudo firewall-cmd --add-port=3334/tcp
$ sudo firewall-cmd --add-port=1935/tcp
$ sudo firewall-cmd --add-port=9999/udp
$ sudo firewall-cmd --add-port=4000/udp
$ sudo firewall-cmd --add-port=3478/tcp
$ sudo firewall-cmd --add-port=9000/tcp
$ sudo firewall-cmd --add-port=10000-10009/udp<Bind>
<Publishers>
...
<Thumbnail>
<Port>20080</Port>
<!-- If you need TLS support, please uncomment below:
<TLSPort>20081</TLSPort>
-->
</Thumbnail>
</Publishers>
</Bind><OutputProfiles>
<OutputProfile>
<Name>default_stream</Name>
<OutputStreamName>${OriginStreamName}_preview</OutputStreamName>
<Encodes>
<Image>
<Codec>jpeg</Codec>
<Framerate>1</Framerate>
<Width>1280</Width>
<Height>720</Height>
</Image>
<Image>
<Codec>png</Codec>
<Framerate>1</Framerate>
<Width>1280</Width>
<Height>720</Height>
</Image>
</Encodes>
</OutputProfile>
</OutputProfiles><Publishers>
...
<Thumbnail>
<CrossDomains>
<Url>*</Url>
</CrossDomains>
</Thumbnail>
</Publishers><Server>
...
<Bind>
<Providers>
<MPEGTS>
<!--
Listen on port 4000,4001,4004,4005
This is just a demonstration to show that
you can configure the port in several ways
-->
<Port>4000-4001,4004,4005/udp</Port>
</MPEGTS>
</Providers>
</Bind>
...
<VirtualHosts>
<VirtualHost>
<Application>
<Providers>
<MPEGTS>
<StreamMap>
<!--
Set the stream name of the client connected to the
port to "stream_${Port}"
For example, if a client connets to port 4000,
OME creates a "stream_4000" stream
-->
<Stream>
<Name>stream_${Port}</Name>
<Port>4000-4001,4004</Port>
</Stream>
<Stream>
<Name>stream_name_for_4005_port</Name>
<Port>4005</Port>
</Stream>
</StreamMap>
</MPEGTS>
</Providers>
<Application>
</VirtualHost>
</VirtualHosts>
</Server># Video / Audio
ffmpeg.exe -re -stream_loop -1 -i <file.ext> -c:v libx264 -bf 0 -x264-params keyint=30:scenecut=0 -acodec aac -pes_payload_size 0 -f mpegts udp://<IP>:4000?pkt_size=1316
# Video only
ffmpeg.exe -re -stream_loop -1 -i <file.ext> -c:v libx264 -bf 0 -x264-params keyint=30:scenecut=0 -an -f mpegts udp://<IP>:4000?pkt_size=1316
# Audio only
ffmpeg.exe -re -stream_loop -1 -i <file.ext> -vn -acodec aac -pes_payload_size 0 -f mpegts udp://<IP>:4000?pkt_size=1316<VirtualHosts>
<VirtualHost include="VHost*.xml" />
<VirtualHost>
<Name>default</Name>
<Host>
<Names>
<!-- Host names
<Name>stream1.airensoft.com</Name>
<Name>stream2.airensoft.com</Name>
<Name>*.sub.airensoft.com</Name>
<Name>192.168.0.1</Name>
-->
<Name>*</Name>
</Names>
<!--
<TLS>
<CertPath>path/to/file.crt</CertPath>
<KeyPath>path/to/file.key</KeyPath>
<ChainCertPath>path/to/file.crt</ChainCertPath>
</TLS>
-->
</Host>
<Origins>
<Origin>
<Location>/app_name/rtsp_stream_name</Location>
<Pass>
<Scheme>rtsp</Scheme>
<Urls><Url>192.168.0.200:554/</Url></Urls>
</Pass>
</Origin>
</Origins>
</VirtualHost>
</VirtualHosts>Authorization: Basic {credentials}
# Authorization
Credentials for HTTP Basic Authentication created with <AccessToken>Content-Type: application/json{
"message": "OK",
"statusCode": 200
}
# statusCode
Same as HTTP Status Code
# message
A human-readable description of the response code<VirtualHost>
<Applications>
<Providers>
<Schedule>
<MediaRootDir>/opt/ovenmediaengine/media</MediaRootDir>
<ScheduleFilesDir>/opt/ovenmediaengine/media</ScheduleFilesDir>
</Schedule>
...<?xml version="1.0" encoding="UTF-8"?>
<Schedule>
<Stream>
<Name>tv1</Name> <!-- optional, using filename without ext -->
<BypassTranscoder>false</BypassTranscoder>
<VideoTrack>true</VideoTrack>
<AudioTrack>true</AudioTrack>
</Stream>
<FallbackProgram> <!-- Not yet supported -->
<Item url="file://sample.mp4" start="0" duration="60000"/>
</FallbackProgram>
<Program name="1" scheduled="2023-09-27T13:21:15.123+09:00" repeat="true">
<Item url="stream://default/app/stream1" duration="60000"/>
</Program>
<Program name="2" scheduled="2022-03-14T15:10:0.0+09:00" repeat="true">
<Item url="file://sample.mp4" start="0" duration="60000"/>
<Item url="stream://default/app/stream1" duration="60000"/> <!-- Not yet supported -->
<Item url="file://sample.mp4" start="60000" duration="120000"/>
</Program>
</Schedule><?xml version="1.0"?>
<Schedule>
<Stream>
<Name>stream</Name>
<BypassTranscoder>false</BypassTranscoder>
<VideoTrack>true</VideoTrack>
<AudioTrack>true</AudioTrack>
</Stream>
<FallbackProgram>
<Item url="file://hevc.mov"/>
<Item url="file://avc.mov"/>
</FallbackProgram>
<Program name="origin" scheduled="2000-01-01T20:57:00.000+09" repeat="true">
<Item url="stream://default/app/input" duration="-1" />
</Program>
</Schedule><Applications>
<Application>
...
<Publishers>
...
<Push>
<!-- [Optional] -->
<StreamMap>
<Enable>false</Enable>
<Path>path/to/map.xml</Path>
</StreamMap>
</Push>
...
</Publishers>
</Application>
</Applications><?xml version="1.0" encoding="UTF-8"?>
<PushInfo>
<Push>
<!-- [Must] -->
<Enable>true</Enable>
<!-- [Must] -->
<StreamName>stream_a_*</StreamName>
<!-- [Optional] -->
<VariantNames>video_h264,audio_aac</VariantNames>
<!-- [Must] -->
<Protocol>rtmp</Protocol>
<!-- [Must] -->
<Url>rtmp://1.2.3.4:1935/app/${SourceStream}</Url>
<!-- <Url>rtmp://1.2.3.4:1935/app/${Stream}</Url> -->
<!-- [Optional] -->
<StreamKey></StreamKey>
<!-- <StreamKey>some-stream-key</StreamKey> -->
</Push>
<Push>
<!-- [Must] -->
<Enable>true</Enable>
<!-- [Must] -->
<StreamName>stream_b_*</StreamName>
<!-- [Optional] -->
<VariantNames></VariantNames>
<!-- [Must] -->
<Protocol>srt</Protocol>
<!-- [Must] -->
<Url>srt://1.2.3.4:9999?streamid=srt%3A%2F%2F1.2.3.4%3A9999%2Fapp%2Fstream</Url>
</Push>
<Push>
<!-- [Must] -->
<Enable>false</Enable>
<!-- [Must] -->
<StreamName>stream_c_*</StreamName>
<!-- [Optional] -->
<VariantNames></VariantNames>
<!-- [Must] -->
<Protocol>mpegts</Protocol>
<!-- [Must] -->
<Url>udp://1.2.3.4:2400</Url>
</Push>
</PushInfo><Bind>
<Providers>
...
<SRT>
<Port>9999</Port>
<!-- <WorkerCount>1</WorkerCount> -->
</SRT>
</Providers><Applications>
<Application>
<Name>app</Name>
<Providers>
<SRT/>Server: srt://your-server-domain.com:<SRT_PORT>
Key: <PERCENT_ENCODED_STREAM_ID><Server>
<Bind>
<Providers>
<SRT>
...
<Options>
<Option>
<Key>SRTO_PBKEYLEN</Key>
<Value>16</Value>
</Option>
<Option>
<Key>SRTO_PASSPHRASE</Key>
<Value>thisismypassphrase</Value>
</Option>
</Options>
</SRT>
...<Bind>
<Providers>
...
<WebRTC>
<Signalling>
<Port>3333</Port>
<TLSPort>3334</TLSPort>
</Signalling>
<IceCandidates>
<TcpRelay>*:3478</TcpRelay>
<TcpForce>false</TcpForce>
<IceCandidate>*:10000-10005/udp</IceCandidate>
</IceCandidates>
</WebRTC>
</Providers><Applications>
<Application>
<Name>app</Name>
<Providers>
<WebRTC>
<Timeout>30000</Timeout>
<CrossDomains>
<Url>*</Url>
</CrossDomains>
</WebRTC><VirtualHost>
<Applications>
<Providers>
...
<Multiplex>
<MuxFilesDir>mux_files</MuxFilesDir>
</Multiplex>
</Providers><?xml version="1.0" encoding="UTF-8"?>
<Multiplex>
<OutputStream>
<Name>stream</Name>
</OutputStream>
<SourceStreams>
<SourceStream>
<Name>tv1</Name>
<Url>stream://default/app/tv1</Url>
<TrackMap>
<Track>
<SourceTrackName>bypass_video</SourceTrackName>
<NewTrackName>tv1_video</NewTrackName>
</Track>
<Track>
<SourceTrackName>bypass_audio</SourceTrackName>
<NewTrackName>tv1_audio</NewTrackName>
</Track>
<Track>
<SourceTrackName>opus</SourceTrackName>
<NewTrackName>tv1_opus</NewTrackName>
</Track>
</TrackMap>
</SourceStream>
<SourceStream>
<Name>tv2</Name>
<Url>stream://default/app/tv2</Url>
<TrackMap>
<Track>
<SourceTrackName>bypass_video</SourceTrackName>
<NewTrackName>tv2_video</NewTrackName>
</Track>
<Track>
<SourceTrackName>bypass_audio</SourceTrackName>
<NewTrackName>tv2_audio</NewTrackName>
</Track>
<Track>
<SourceTrackName>opus</SourceTrackName>
<NewTrackName>tv2_opus</NewTrackName>
</Track>
</TrackMap>
</SourceStream>
</SourceStreams>
<Playlists>
<Playlist>
<Name>LLHLS ABR</Name>
<FileName>abr</FileName>
<Rendition>
<Name>1080p</Name>
<Video>tv1_video</Video>
<Audio>tv1_audio</Audio>
</Rendition>
<Rendition>
<Name>720p</Name>
<Video>tv2_video</Video>
<Audio>tv2_audio</Audio>
</Rendition>
</Playlist>
</Playlists>
</Multiplex>
Content-Type: application/jsonAuthorization: Basic {credentials}
# Authorization
Credentials for HTTP Basic Authentication created with <AccessToken>{
"eventFormat": "id3v2",
"eventType": "video",
"events":[
{
"frameType": "TXXX",
"info": "AirenSoft",
"data": "OvenMediaEngine"
},
{
"frameType": "TIT2",
"data": "OvenMediaEngine 123"
}
]
}
# eventFormat
Currently only id3v2 is supported.
# eventType (Optional, Default : event)
Select one of event, video, and audio. event inserts an event into every track.
video inserts events only on tracks of video type.
audio inserts events only on tracks of audio type.
# events
It accepts only Json array format and can contain multiple events.
## frameType
Currently, only TXXX and T??? (Text Information Frames, e.g. TIT2) are supported.
## info
This field is used only in TXXX and is entered in the Description field of TXXX.
## data
If the frameType is TXXX, it is entered in the Value field,
and if the frameType is "T???", it is entered in the Information field.WWW-Authenticate: Basic realm=”OvenMediaEngine”{
"statusCode": 200,
{
"message": "[HTTP] Authorization header is required to call API (401)",
{
"statusCode": 404,
"message": "Could not find the application: [default/non-exists] (404)"
}docker run --name ome -d -e OME_HOST_IP=Your.HOST.IP.Address \
-p 1935:1935 -p 9999:9999/udp -p 9000:9000 -p 3333:3333 -p 3478:3478 -p 10000-10009:10000-10009/udp \
airensoft/ovenmediaengine:latestexport OME_DOCKER_HOME=/opt/ovenmediaengine
sudo mkdir -p $OME_DOCKER_HOME/conf
sudo mkdir -p $OME_DOCKER_HOME/logs
# Set permissions for the created directory if necessary.
sudo chgrp -R docker $OME_DOCKER_HOME
sudo chmod -R 775 $OME_DOCKER_HOME
# If you want to use OME_HOME permanently, add the following line to the ~/.profile file for bash, for other shells, you can do it accordingly.
echo "export OME_DOCKER_HOME=/opt/ovenmediaengine" >> ~/.profiledocker run -d --name tmp-ome airensoft/ovenmediaengine:latest
docker cp tmp-ome:/opt/ovenmediaengine/bin/origin_conf/Server.xml $OME_DOCKER_HOME/conf
docker cp tmp-ome:/opt/ovenmediaengine/bin/origin_conf/Logger.xml $OME_DOCKER_HOME/conf
docker rm -f tmp-omecp /your/server_certificate_file.crt $OME_DOCKER_HOME/conf/cert.crt
cp /your/certificate_key_file.key $OME_DOCKER_HOME/conf/cert.key
cp /your/ca_bundle_file.ca-bundle $OME_DOCKER_HOME/conf/cert.ca-bundlevi $OME_DOCKER_HOME/conf/Server.xmldocker run -d -it --name ome -e OME_HOST_IP=Your.HOST.IP.Address \
-v $OME_DOCKER_HOME/conf:/opt/ovenmediaengine/bin/origin_conf \
-v $OME_DOCKER_HOME/logs:/var/log/ovenmediaengine \
-p 1935:1935 -p 9999:9999/udp -p 9000:9000 -p 3333:3333 -p 3478:3478 \
-p 10000-10009:10000-10009/udp \
airensoft/ovenmediaengine:latesttail -f $OME_DOCKER_HOME/logs/ovenmediaengine.logdocker restart omedocker stop ome
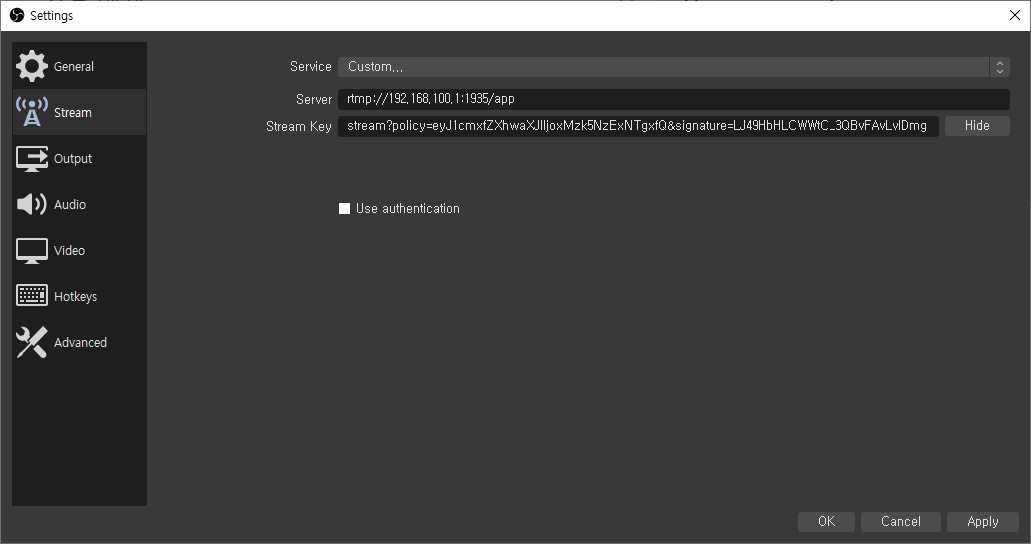
docker rm omescheme://domain.com:port/app/stream?policy=<>&signature=<>
(curl -LOJ https://github.com/AirenSoft/OvenMediaEngine/archive/master.tar.gz && tar
$ nvidia-smi
Thu Jun 17
Authorization: Basic {credentials}
# Authorization
Credentials for HTTP Basic Authentication created with <AccessToken>
{
"url_activate":1399711581,
"url_expire":1399721581,
"stream_expire":1399821581,
"allow_ip":"192.168.100.5/32",
"real_ip":"111.111.111.111/32"
}Base64URL.Encode(
HMAC.Encrypt(
SHA1,
secret_key,
"scheme://domain.com:port/app/stream[/file]?policy='encoded policy'>"
)
)<VirtualHost>
<SignedPolicy>
<PolicyQueryKeyName>policy</PolicyQueryKeyName>
<SignatureQueryKeyName>signature</SignatureQueryKeyName>
<SecretKey>aKq#1kj</SecretKey>
<Enables>
<Providers>rtmp</Providers>
<Publishers>webrtc,llhls,thumbnail</Publishers>
</Enables>
</SignedPolicy>
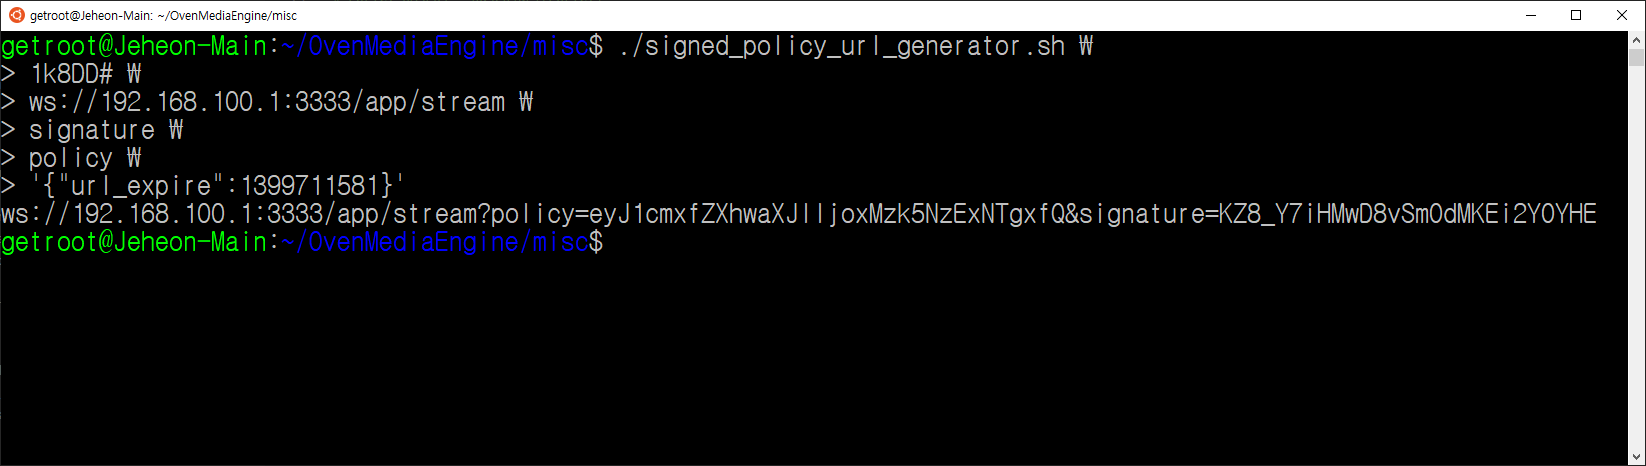
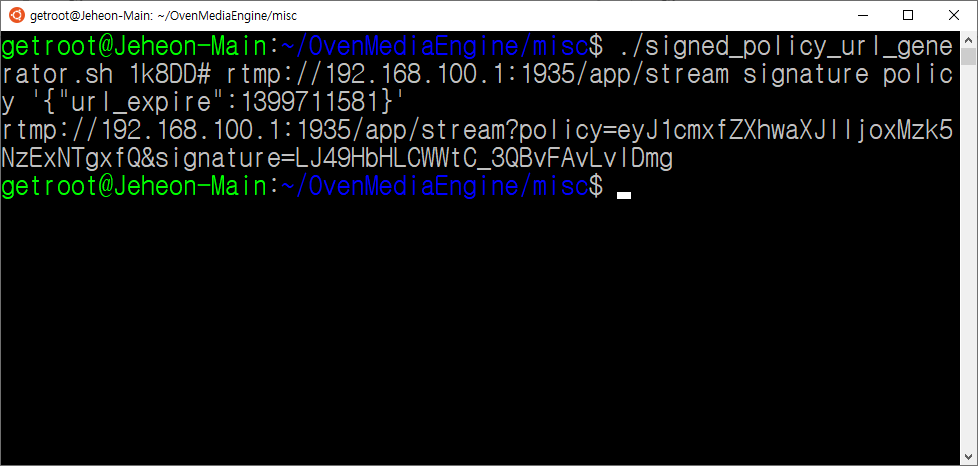
</VirtualHost>/misc/signed_policy_url_generator.sh./signed_policy_generator.sh [HMAC_KEY] [BASE_URL] [SIGNATURE_QUERY_KEY_NAME] [POLICY_QUERY_KEY_NAME] [POLICY]{"url_expire":1399721581}eyJ1cmxfZXhwaXJlIjoxMzk5NzIxNTgxfQws://192.168.0.100:3333/app/stream?policy=eyJ1cmxfZXhwaXJlIjoxMzk5NzIxNTgxfQws://192.168.0.100:3333/app/stream?policy=eyJ1cmxfZXhwaXJlIjoxMzk5NzIxNTgxfQdvVdBpoxAeCPl94Kt5RoiqLI0YEws://192.168.0.100/app/stream?policy=eyJ1cmxfZXhwaXJlIjoxMzk5NzIxNTgxfQ&signature=dvVdBpoxAeCPl94Kt5RoiqLI0YE(curl -LOJ https://github.com/AirenSoft/OvenMediaEngine/archive/master.tar.gz && tar xvfz OvenMediaEngine-master.tar.gz)
OvenMediaEngine-master/misc/install_intel_driver.shldconfig -p | grep libxcoder_logan.sodocker run -d ... --gpus all airensoft/ovenmediaengine:devOvenMediaEngine-master/misc/prerequisites.sh --enable-nvc<OutputProfiles>
<HWAccels>
<!--
Setting for Hardware Modules.
- nv : Nvidia Video Codec SDK
- xma :Xilinx Media Accelerator
- qsv :Intel Quick Sync Video
- nilogan: Netint VPU
You can use multiple modules by separating them with commas.
For example, if you want to use xma and nv, you can set it as follows.
<Modules>[ModuleName]:[DeviceId],[ModuleName]:[DeviceId],...</Modules>
<Modules>xma:0,nv:0</Modules>
-->
<Decoder>
<Enable>true</Enable>
<Modules>nv</Modules>
</Decoder>
<Encoder>
<Enable>true</Enable>
<Modules>nv</Modules>
</Encoder>
</HWAccels>
<OutputProfile>
...
</OutputProfile>
</OutputProfiles>Authorization: Basic {credentials}
# Authorization
Credentials for HTTP Basic Authentication created with <AccessToken>Content-Type: application/json{
"statusCode": 200,
"message": "OK",
"response": {
"connections": {
"file": 0,
"llhls": 0,
"mpegtspush": 0,
"ovt": 0,
"rtmppush": 0,
"thumbnail": 0,
"webrtc": 0
},
"createdTime": "2023-03-15T19:46:13.728+09:00",
"lastRecvTime": "2023-03-15T19:46:13.728+09:00",
"lastSentTime": "2023-03-15T19:46:13.728+09:00",
"lastUpdatedTime": "2023-03-15T19:46:13.728+09:00",
"lastThroughputIn": 0,
"lastThroughputOut": 0,
"maxTotalConnectionTime": "2023-03-15T19:46:13.728+09:00",
"maxTotalConnections": 0,
"totalBytesIn": 0,
"totalBytesOut": 0,
"totalConnections": 0,
"avgThroughputIn": 0,
"avgThroughputOut": 0,
"maxThroughputIn": 0,
"maxThroughputOut": 0
}
}WWW-Authenticate: Basic realm=”OvenMediaEngine”{
"message": "[HTTP] Authorization header is required to call API (401)",
"statusCode": 401
}{
"message": "[HTTP] Could not find the application: [default/app1] (404)",
"statusCode": 404
}Authorization: Basic {credentials}
# Authorization
Credentials for HTTP Basic Authentication created with <AccessToken>Content-Type: application/json{
"statusCode": 200,
"message": "OK",
"response": {
"connections": {
"file": 0,
"llhls": 0,
"mpegtspush": 0,
"ovt": 0,
"rtmppush": 0,
"thumbnail": 0,
"webrtc": 0
},
"createdTime": "2023-03-15T19:46:13.728+09:00",
"lastRecvTime": "2023-03-15T19:46:13.728+09:00",
"lastSentTime": "2023-03-15T19:46:13.728+09:00",
"lastUpdatedTime": "2023-03-15T19:46:13.728+09:00",
"lastThroughputIn": 0,
"lastThroughputOut": 0,
"maxTotalConnectionTime": "2023-03-15T19:46:13.728+09:00",
"maxTotalConnections": 0,
"totalBytesIn": 0,
"totalBytesOut": 0,
"totalConnections": 0,
"avgThroughputIn": 0,
"avgThroughputOut": 0,
"maxThroughputIn": 0,
"maxThroughputOut": 0
}
}WWW-Authenticate: Basic realm=”OvenMediaEngine”{
"message": "[HTTP] Authorization header is required to call API (401)",
"statusCode": 401
}{
"message": "[HTTP] Could not find the stream: [default/#default#app/stream] (404)",
"statusCode": 404
}Header-Key: Value
# Header-Key
DescriptionHeader-Key: Value<Server version="8">
...
<Bind>
<Managers>
<API>
<Port>8081</Port>
<TLSPort>8082</TLSPort>
</API>
</Managers>
...
</Bind>
...
</Server><Server version="8">
<Bind>
...
</Bind>
<Managers>
<Host>
<Names>
<Name>*</Name>
</Names>
<TLS>
<CertPath>airensoft_com.crt</CertPath>
<KeyPath>airensoft_com.key</KeyPath>
<ChainCertPath>airensoft_com_chain.crt</ChainCertPath>
</TLS>
</Host>
<API>
<AccessToken>your_access_token</AccessToken>
<CrossDomains>
<Url>*.airensoft.com</Url>
<Url>http://*.sub-domain.airensoft.com</Url>
<Url>http?://airensoft.*</Url>
</CrossDomains>
</API>
</Managers>
<VirtualHosts>
...
</VirtualHosts>
</Server>
OvenMediaEngine-master/misc/install_nvidia_docker_container.shOvenMediaEngine-master/Dockerfile.cuda
OvenMediaEngine-master/Dockerfile.cuda.local# Use the samples provided in the Intel Media SDK
# Check the list of codecs supported by iGPU
/MediaSDK-intel-mediasdk-21.1.2/build/__bin/release/simple_7_codecOvenMediaEngine-master/misc/prerequisites.sh --enable-qsv./prerequisites.sh --enable-nilogan --nilogan-path=/root/T4xx/release/FFmpeg-n5.0_t4xx_patch{
"requestId": "value"
}
# key (required)
The description of the key/value of the body content is provided like this.{
"statusCode": 200,
"message": "OK",
"response": {
}
}
# statusCode
Same as HTTP Status Code
# message
A human-readable description of the response code
# response
Response ContentsServer.xml
<Publishers>
<FILE>
<!-- [Optional] -->
<RootPath>/mnt/shared_volumes</RootPath>
<!-- [Must] Recorded file and info path
When recording starts via the API, the following path is used as
the default path. If a path is set via the API, it will not be used.
-->
<FilePath>/${VirtualHost}/${Application}/${Stream}/
${StartTime:YYYYMMDDhhmmss}_${EndTime:YYYYMMDDhhmmss}.ts</FilePath>
<InfoPath>/${VirtualHost}/${Application}/${Stream}.xml</InfoPath>
<!-- [Optional] Recording settings for file-based automatic recording -->
<StreamMap>
<Enable>true</Enable>
<Path>./record_map.xml</Path>
</StreamMap>
</FILE>
</Publishers><?xml version="1.0" encoding="UTF-8"?>
<RecordInfo>
<Record>
<!-- [Must] -->
<Enable>true</Enable>
<!-- [Must] -->
<StreamName>stream1*</StreamName>
<!-- [Optional] -->
<VariantNames>h264_1080p,aac_128k</VariantNames>
<!-- [Optional] -->
<FilePath>/path/to/${VirtualHost}/${Application}/${Stream}/
${StartTime:YYYYMMDDhhmmss}_${EndTime:YYYYMMDDhhmmss}.mp4</FilePath>
<!-- [Optional] -->
<InfoPath>/path/to/${VirtualHost}/${Application}/${Stream}/info.xml</InfoPath>
<!-- [Optional] -->
<Metadata>access_key_id='000000000000000',secret_access_key='000000000000000'
,endpoint='https://s3.aws.com'</Metadata>
</Record>
<Record>
<Enable>true</Enable>
<StreamName>stream2*</StreamName>
<VariantNames>h264_1080p,aac_128k</VariantNames>
<FilePath>/path/to/${VirtualHost}/${Application}/${Stream}/
${EndTime:YYYYMMDDhhmmss}_${Sequence}.mp4</FilePath>
<InfoPath>/path/to/${VirtualHost}/${Application}/${Stream}/info.xml</InfoPath>
<!-- [Optional] -->
<SegmentInterval>5000</SegmentInterval>
<!-- [Optional] Default : discontinuity -->
<SegmentRule>continuity</SegmentRule>
</Record>
<Record>
<Enable>true</Enable>
<StreamName>stream3*</StreamName>
<VariantNames>aac_128k</VariantNames>
<FilePath>/path/to/${VirtualHost}/${Application}/${Stream}/
${StartTime:YYYYMMDDhhmmss}_${Sequence}.mp4</FilePath>
<InfoPath>/path/to/${VirtualHost}/${Application}/${Stream}/info.xml</InfoPath>
<!-- [Optional] -->
<SegmentSchedule>*/30 * *</SegmentSchedule>
<!-- [Optional] -->
<SegmentRule>discontinuity</SegmentRule>
</Record>
</RecordInfo><?xml version="1.0" encoding="utf-8"?>
<files>
<file>
<transactionId>bcUCyJeKuOGnsah3</transactionId>
<id>CTS_ID001</id>
<vhost>default</vhost>
<app>app</app>
<stream>stream_o</stream>
<filePath><![CDATA[/home/dev/OvenMediaEngine/records/bcUCyJeKuOGnsah3_default_app_stream_o_20201204005351_20201204005405.ts]]></filePath>
<recordBytes>8774737</recordBytes>
<recordTime>60011</recordTime>
<sequence>0</sequence>
<interval>60000</interval>
<lastSequence>true</lastSequence>
<createdTime>2020-12-04T12:53:51.455+0900</createdTime>
<startTime>2020-12-04T12:53:51.612+0900</startTime>
<finishTime>2020-12-04T12:54:51.473+0900</finishTime>
</file>
<file>
<transactionId>bcUCyJeKuOGnsah3</transactionId>
<id>CTS_ID001</id>
<vhost>default</vhost>
<app>app</app>
<stream>stream_o</stream>
<filePath><![CDATA[/home/dev/OvenMediaEngine/records/bcUCyJeKuOGnsah3_default_app_stream_o_20201204005408_20201204005412.ts]]></filePath>
<recordBytes>2285797</recordBytes>
<recordTime>60012</recordTime>
<sequence>0</sequence>
<schedule>0 */1 *</schedule>
<lastSequence>false</lastSequence>
<createdTime>2020-12-04T12:53:00.000+0900</createdTime>
<startTime>2020-12-04T12:53:00.000+0900</startTime>
<finishTime>2020-12-04T12:54:00.000+0900</finishTime>
</file>
<file>
<transactionId>bcUCyJeKuOGnsah3</transactionId>
<id>CTS_ID001</id>
<vhost>default</vhost>
<app>app</app>
<stream>stream_o</stream>
<filePath><![CDATA[/home/dev/OvenMediaEngine/records/bcUCyJeKuOGnsah3_default_app_stream_o_20201204005415_20201204005422.ts]]></filePath>
<recordBytes>4544626</recordBytes>
<recordTime>60000</recordTime>
<sequence>1</sequence>
<schedule>0 */1 *</schedule>
<lastSequence>true</lastSequence>
<createdTime>2020-12-04T12:54:00.000+0900</createdTime>
<startTime>2020-12-04T12:54:00.000+0900</startTime>
<finishTime>2020-12-04T12:55:00.000+0900</finishTime>
</file>
</files><Logger version="2">
<!-- Log file location -->
<Path>/var/log/ovenmediaengine</Path>
<!-- Disable some SRT internal logs -->
<Tag name="SRT" level="critical" />
<Tag name="Monitor" level="critical" />
<!-- Log level: [debug, info, warn, error, critical] -->
<Tag name=".*" level="info" />
</Logger>
/var/log/ovenmediaengine/<OvenMediaEngine Binary Path>/log/# For Origin mode
/opt/ovenmediaengine/bin/log/
# For Edge mode
/opt/ovenmediaengine/bin/log/getroot@Jeheon-Main:/var/log/ovenmediaengine$ cat ovenmediaengine.log
[03-27 19:59:13.221] I 10996 Config | config_manager.cpp:144 | Trying to set logfile in directory... (/var/log/ovenmediaengine)
[03-27 19:59:13.221] I 10996 Config | config_manager.cpp:47 | Trying to load configurations... (origin_conf/Server.xml)
[03-27 19:59:13.235] I 10996 OvenMediaEngine | main.cpp:211 | OvenMediaEngine v0.9.5 (v0.9.1-422-g6e4b7ce) is started on [Jeheon-Main] (Linux x86_64 - 4.4.0-18362-Microsoft, #476-Microsoft Fri Nov 01 16:53:00 PST 2019)
[03-27 19:59:13.235] I 10996 OvenMediaEngine | main.cpp:213 | With modules:
[03-27 19:59:13.235] I 10996 OvenMediaEngine | main.cpp:214 | FFmpeg 3.4.2
[03-27 19:59:13.235] I 10996 OvenMediaEngine | main.cpp:215 | Configuration: --prefix=/opt/ovenmediaengine --enable-gpl --enable-nonfree --extra-cflags=-I/opt/ovenmediaengine/include --extra-ldflags='-L/opt/ovenmediaengine/lib -Wl,-rpath,/opt/ovenmediaengine/lib' --extra-libs=-ldl --enable-shared --disable-static --disable-debug --disable-doc --disable-programs --disable-avdevice --disable-dct --disable-dwt --disable-error-resilience --disable-lsp --disable-lzo --disable-rdft --disable-faan --disable-pixelutils --disable-everything --enable-zlib --enable-libopus --enable-libvpx --enable-libfdk_aac --enable-libx264 --enable-encoder='libvpx_vp8,libvpx_vp9,libopus,libfdk_aac,libx264' --enable-decoder='aac,aac_latm,aac_fixed,h264' --enable-parser='aac,aac_latm,aac_fixed,h264' --enable-network --enable-protocol=tcp --enable-protocol=udp --enable-protocol=rtp --enable-demuxer=rtsp --enable-filter='asetnsamples,aresample,aformat,channelmap,channelsplit,scale,transpose,fps,settb,asettb'
[03-27 19:59:13.235] I 10996 OvenMediaEngine | main.cpp:216 | libavformat: 57.83.100
[03-27 19:59:13.235] I 10996 OvenMediaEngine | main.cpp:217 | libavcodec: 57.107.100
[03-27 19:59:13.235] I 10996 OvenMediaEngine | main.cpp:218 | libavutil: 55.78.100
[03-27 19:59:13.235] I 10996 OvenMediaEngine | main.cpp:219 | libavfilter: 6.107.100
[03-27 19:59:13.235] I 10996 OvenMediaEngine | main.cpp:220 | libswresample: 2.9.100
[03-27 19:59:13.235] I 10996 OvenMediaEngine | main.cpp:221 | libswscale: 4.8.100
[03-27 19:59:13.235] I 10996 OvenMediaEngine | main.cpp:222 | SRT: 1.3.3
[03-27 19:59:13.235] I 10996 OvenMediaEngine | main.cpp:223 | SRTP: libsrtp2 2.2.0
[03-27 19:59:13.235] I 10996 OvenMediaEngine | main.cpp:224 | OpenSSL: OpenSSL 1.1.0g 2 Nov 2017
[03-27 19:59:13.235] I 10996 OvenMediaEngine | main.cpp:225 | Configuration: compiler: gcc -DDSO_DLFCN -DHAVE_DLFCN_H -DNDEBUG -DOPENSSL_THREADS -DOPENSSL_NO_STATIC_ENGINE -DOPENSSL_PIC -DOPENSSL_IA32_SSE2 -DOPENSSL_BN_ASM_MONT -DOPENSSL_BN_ASM_MONT5 -DOPENSSL_BN_ASM_GF2m -DSHA1_ASM -DSHA256_ASM -DSHA512_ASM -DRC4_ASM -DMD5_ASM -DAES_ASM -DVPAES_ASM -DBSAES_ASM -DGHASH_ASM -DECP_NISTZ256_ASM -DPADLOCK_ASM -DPOLY1305_ASM -DOPENSSLDIR="\"/opt/ovenmediaengine\"" -DENGINESDIR="\"/opt/ovenmediaengine/lib/engines-1.1\"" -Wa,--noexecstack
[03-27 19:59:13.240] I 10996 Monitor | monitoring.cpp:35 | Create HostMetrics(default) for monitoring
[03-27 19:59:13.240] I 10996 OvenMediaEngine | main.cpp:148 | Trying to create a module MediaRouter for [default] host...
[03-27 19:59:13.240] I 10996 MediaRouter | media_router.cpp:40 | MediaRouter has been started.
[03-27 19:59:13.240] I 10996 OvenMediaEngine | main.cpp:151 | Trying to create a module RTMP Provider for [default] host...
[03-27 19:59:13.244] I 10996 RtmpProvider | rtmp_provider.cpp:63 | RTMP Server has started listening on 0.0.0.0:1935...
[03-27 19:59:13.246] I 10996 Provider | provider.cpp:40 | RtmpProvider has been started.
[03-27 19:59:13.246] I 10996 OvenMediaEngine | main.cpp:152 | Trying to create a module OVT Provider for [default] host...
[03-27 19:59:13.248] I 10996 Provider | provider.cpp:40 | OvtProvider has been started.
[03-27 19:59:13.248] I 10996 OvenMediaEngine | main.cpp:153 | Trying to create a module RTSPC Provider for [default] host...
[03-27 19:59:13.250] I 10996 Provider | provider.cpp:40 | RtspcProvider has been started.
[03-27 19:59:13.250] I 10996 OvenMediaEngine | main.cpp:154 | Trying to create a module RTSP Provider for [default] host...
[03-27 19:59:13.250] I 10996 RtspProvider | rtsp_provider.cpp:40 | RTSP is disabled in the configuration.
[03-27 19:59:13.251] I 10996 OvenMediaEngine | main.cpp:157 | Trying to create a module Transcoder for [default] host...
[03-27 19:59:13.251] I 10996 Transcoder | transcoder.cpp:38 | Transcoder has been started.
[03-27 19:59:13.251] I 10996 OvenMediaEngine | main.cpp:160 | Trying to create a module WebRTC Publisher for [default] host...
[03-27 19:59:13.251] I 10996 Signalling | rtc_signalling_server.cpp:74 | P2P is disabled in the configuration
[03-27 19:59:13.258] I 10996 Ice | ice_port.cpp:89 | ICE port is bound to 0.0.0.0:10000/UDP
[03-27 19:59:13.260] I 10996 Ice | ice_port.cpp:89 | ICE port is bound to 0.0.0.0:10001/UDP
[03-27 19:59:13.261] I 10996 Ice | ice_port.cpp:89 | ICE port is bound to 0.0.0.0:10002/UDP
[03-27 19:59:13.263] I 10996 Ice | ice_port.cpp:89 | ICE port is bound to 0.0.0.0:10003/UDP
[03-27 19:59:13.264] I 10996 Ice | ice_port.cpp:89 | ICE port is bound to 0.0.0.0:10004/UDP
[03-27 19:59:13.266] I 10996 Ice | ice_port.cpp:89 | ICE port is bound to 0.0.0.0:10005/UDP
[03-27 19:59:13.266] I 10996 Publisher | publisher.cpp:15 | WebRTC Publisher has been started.
[03-27 19:59:13.266] I 10996 WebRTC | webrtc_publisher.cpp:89 | WebRTC Publisher has started listening on 0.0.0.0:3333...
[03-27 19:59:13.266] I 10996 Publisher | publisher.cpp:15 | WebRTC Publisher has been started.
[03-27 19:59:13.266] I 10996 OvenMediaEngine | main.cpp:161 | Trying to create a module HLS Publisher for [default] host...
[03-27 19:59:13.273] I 10996 Publisher | segment_publisher.cpp:65 | HLS Publisher has started listening on 0.0.0.0:8080...
[03-27 19:59:13.273] I 10996 Publisher | publisher.cpp:15 | HLS Publisher has been started.
[03-27 19:59:13.275] I 10996 OvenMediaEngine | main.cpp:162 | Trying to create a module MPEG-DASH Publisher for [default] host...
[03-27 19:59:13.281] I 10996 Publisher | segment_publisher.cpp:65 | DASH Publisher has started listening on 0.0.0.0:8080...
[03-27 19:59:13.281] I 10996 Publisher | publisher.cpp:15 | DASH Publisher has been started.
[03-27 19:59:13.282] I 10996 OvenMediaEngine | main.cpp:163 | Trying to create a module Low-Latency MPEG-DASH Publisher for [default] host...
[03-27 19:59:13.289] I 10996 Publisher | segment_publisher.cpp:65 | LLDASH Publisher has started listening on 0.0.0.0:8080...
[03-27 19:59:13.289] I 10996 Publisher | publisher.cpp:15 | LLDASH Publisher has been started.
[03-27 19:59:13.291] I 10996 OvenMediaEngine | main.cpp:164 | Trying to create a module OVT Publisher for [default] host...
[03-27 19:59:13.294] I 10996 OVT | ovt_publisher.cpp:49 | Ovt Publisher has started listening on 0.0.0.0:9000
[03-27 19:59:13.294] I 10996 Publisher | publisher.cpp:15 | OVTPublisher has been started.
[03-27 19:59:13.294] I 10996 OvenMediaEngine | main.cpp:169 | All modules are initialized successfully
[03-27 19:59:13.294] I 10996 Orchestrator | orchestrator.cpp:856 | Trying to create an application: [#default#app]
[03-27 19:59:13.294] I 10996 Monitor | host_metrics.cpp:52 | Create ApplicationMetrics(#default#app) for monitoring
[03-27 19:59:13.297] I 10996 Provider | application.cpp:30 | [#default#app] RTMP Provider application has been started
[03-27 19:59:13.297] I 10996 Provider | application.cpp:30 | [#default#app] OVT Provider application has been started
[03-27 19:59:13.297] I 10996 Provider | application.cpp:30 | [#default#app] RTSP Pull Provider application has been started
[03-27 19:59:13.297] I 10996 Provider | application.cpp:30 | [#default#app] RTSP Provider application has been started
[03-27 19:59:13.298] I 10996 TranscodeApplication | transcode_application.cpp:36 | [#default#app] Transcoder Application has been started
[03-27 19:59:13.300] I 10996 Publisher | application.cpp:26 | [#default#app] WebRTC Publisher application has been started
[03-27 19:59:13.302] I 10996 Publisher | application.cpp:26 | [#default#app] HLS Publisher application has been started
[03-27 19:59:13.304] I 10996 Publisher | application.cpp:26 | [#default#app] DASH Publisher application has been started
[03-27 19:59:13.305] I 10996 Publisher | application.cpp:26 | [#default#app] LLDASH Publisher application has been started
[03-27 19:59:13.307] I 10996 Publisher | application.cpp:26 | [#default#app] OVT Publisher application has been started
[03-27 19:59:14.706] I 11002 RtmpProvider | rtmp_server.cpp:126 | A RTMP client has connected from <ClientSocket: 0x7fffd4000b70, #24, state: 4, TCP, 192.168.0.200:11031>
[03-27 19:59:14.835] I 11002 RtmpProvider | rtmp_server.cpp:226 | [#default#app/stream] RTMP Provider stream has been created: id(0/0) device(OBS) remote(<ClientSocket: 0x7fffd4000b70, #24, state: 4, TCP, 192.168.0.200:11031>)
[03-27 19:59:14.835] I 11002 MediaRouter.App | media_route_application.cpp:184 | Trying to create a stream: [#default#app/stream(2921228900)]
[03-27 19:59:14.836] I 11002 Monitor | stream.cpp:240 |
[Stream Info]
id(2921228900), name(stream), SourceType(Rtmp), Created Time (Fri Mar 27 19:59:14 2020)
Video Track #0: Bypass(false) Bitrate(2.50Mb) codec(1, avc) resolution(1280x720) framerate(30.00fps) timebase(1/90000)
Audio Track #1: Bypass(false) Bitrate(160.00Kb) codec(5, aac) samplerate(44.1K) format(s16, 16) channel(stereo, 2) timebase(1/44100)
[03-27 19:59:14.836] I 11002 Monitor | application_metrics.cpp:56 | Create StreamMetrics(stream) for monitoring
[03-27 19:59:14.836] I 11002 TranscodeStream | transcode_stream.cpp:353 | [#default#app/stream(2921228900)] -> [#default#app/stream_medium_o(3169746412)] Transcoder output stream has been created.
[03-27 19:59:14.839] I 11002 FFmpeg | third_parties.cpp:115 | [AVCodecContext] using SAR=1/1
[03-27 19:59:14.841] I 11002 FFmpeg | third_parties.cpp:115 | [AVCodecContext] using cpu capabilities: MMX2 SSE2Fast SSSE3 SSE4.2 AVX FMA3 BMI2 AVX2
[03-27 19:59:14.846] I 11002 FFmpeg | third_parties.cpp:115 | [AVCodecContext] profile Constrained Baseline, level 3.0, 4:2:0, 8-bit
[03-27 19:59:14.849] I 11002 FFmpeg | third_parties.cpp:115 | [AVCodecContext] v1.7.0
[03-27 19:59:14.864] I 11048 MediaRouter.App | media_route_application.cpp:184 | Trying to create a stream: [#default#app/stream_medium_o(3169746412)]
[03-27 19:59:14.864] I 11002 TranscodeStream | transcode_stream.cpp:108 | [#default#app/stream(2921228900)] Transcoder input stream has been started. Status : (2) Decoders, (4) Encoders
[03-27 19:59:14.865] I 11048 Monitor | stream.cpp:240 |
[Stream Info]
id(3169746412), name(stream_medium_o), SourceType(Transcoder), Created Time (Fri Mar 27 19:59:14 2020)
>> Origin Stream Info
id(2921228900), name(stream), SourceType(Rtmp), Created Time (Fri Mar 27 19:59:14 2020)
Video Track #0: Bypass(false) Bitrate(700.00Kb) codec(2, vp8) resolution(640x360) framerate(30.00fps) timebase(1/90000)
Video Track #1: Bypass(false) Bitrate(700.00Kb) codec(1, avc) resolution(640x360) framerate(30.00fps) timebase(1/90000)
Audio Track #2: Bypass(false) Bitrate(48.00Kb) codec(7, opus) samplerate(48.0K) format(s16, 16) channel(stereo, 2) timebase(1/48000)
Audio Track #3: Bypass(false) Bitrate(48.00Kb) codec(5, aac) samplerate(48.0K) format(s16, 16) channel(stereo, 2) timebase(1/48000)
[03-27 19:59:14.865] I 11048 Monitor | application_metrics.cpp:56 | Create StreamMetrics(stream_medium_o) for monitoring
[03-27 19:59:14.865] I 11048 WebRTC | rtc_stream.cpp:181 | Unsupported codec(Audio/AAC) is being input from media track
[03-27 19:59:14.880] I 11048 Publisher | stream.cpp:192 | [stream_medium_o(3169746412)] WebRTC Publisher stream has been started
[03-27 19:59:14.881] I 11048 Publisher | stream.cpp:192 | [stream_medium_o(3169746412)] HLS Publisher stream has been started
[03-27 19:59:14.881] I 11048 Publisher | stream.cpp:192 | [stream_medium_o(3169746412)] DASH Publisher stream has been started
[03-27 19:59:14.881] I 11048 Publisher | stream.cpp:192 | [stream_medium_o(3169746412)] LLDASH Publisher stream has been started
[03-27 19:59:14.897] I 11048 Publisher | stream.cpp:192 | [stream_medium_o(3169746412)] OVT Publisher stream has been started
[03-27 19:59:14.898] I 11048 TranscodeCodec | transcode_codec_dec_aac.cpp:49 | [#default#app/stream(2921228900)] input stream information: [audio] aac (LC), 44100 Hz, stereo, fltp, 154 kbps, timebase: 1/44100, frame_size: 1024
[03-27 19:59:14.985] I 11048 TranscodeCodec | transcode_codec_dec_avc.cpp:48 | [#default#app/stream(2921228900)] input stream information: [video] h264 (Constrained Baseline 3.1), yuv420p, 1280x720 [SAR 0:1 DAR 16:9], 30 fps, 195 kbps, timebase: 1/60, frame_size: 0Content-Type: application/jsonAuthorization: Basic {credentials}
Content-Type: application/json
# Authorization
Credentials for HTTP Basic Authentication created with <AccessToken>WWW-Authenticate: Basic realm=”OvenMediaEngine”{
"outputStreamName": "stream",
{
"statusCode": 200,
{
"message": "[HTTP] Authorization header is required to call API (401)",
<?xml version="1.0" encoding="UTF-8"?>
<Server version="8">
<Bind>
<Publishers>
<HLS>
<Port>13333</Port>
<TLSPort>13334</TLSPort>
<WorkerCount>1</WorkerCount>
</HLS>
</Publishers>
</Bind>
<VirtualHosts>
<VirtualHost>
<Applications>
<Application>
<Publishers>
<HLS>
<SegmentCount>5</SegmentCount>
<SegmentDuration>4</SegmentDuration>
<DVR>
<Enable>true</Enable>
<EventPlaylistType>false</EventPlaylistType>
<TempStoragePath>/tmp/ome_dvr/</TempStoragePath>
<MaxDuration>600</MaxDuration>
</DVR>
<CrossDomains>
<Url>*</Url>
</CrossDomains>
</HLS>
</Publishers>
</Application>
</Applications>
</VirtualHost>
</VirtualHosts>
</Server><OutputProfiles>
<OutputProfile>
<Name>bypass_stream</Name>
<OutputStreamName>${OriginStreamName}</OutputStreamName>
<Encodes>
<Audio>
<Bypass>true</Bypass>
</Audio>
<Video>
<Bypass>true</Bypass>
</Video>
</Encodes>
</OutputProfile>
</OutputProfiles><?xml version="1.0" encoding="UTF-8"?>
<OutputProfile>
<Name>abr_stream</Name>
<OutputStreamName>${OriginStreamName}</OutputStreamName>
<Playlist>
<Name>abr</Name>
<FileName>abr</FileName>
<Options>
<HLSChunklistPathDepth>0</HLSChunklistPathDepth>
<EnableTsPackaging>true</EnableTsPackaging>
</Options>
<Rendition>
<Name>SD</Name>
<Video>video_360</Video>
<Audio>aac_audio</Audio>
</Rendition>
<Rendition>
<Name>HD</Name>
<Video>video_720</Video>
<Audio>aac_audio</Audio>
</Rendition>
<Rendition>
<Name>FHD</Name>
<Video>video_1080</Video>
<Audio>aac_audio</Audio>
</Rendition>
</Playlist>
<Encodes>
<Audio>
<Name>aac_audio</Name>
<Codec>aac</Codec>
<Bitrate>128000</Bitrate>
<Samplerate>48000</Samplerate>
<Channel>2</Channel>
<BypassIfMatch>
<Codec>eq</Codec>
</BypassIfMatch>
</Audio>
<Video>
<Name>video_360</Name>
<Codec>h264</Codec>
<Bitrate>365000</Bitrate>
<Framerate>30</Framerate>
<Width>640</Width>
<Height>360</Height>
<KeyFrameInterval>30</KeyFrameInterval>
<ThreadCount>2</ThreadCount>
<Preset>medium</Preset>
<BFrames>0</BFrames>
<ThreadCount>1</ThreadCount>
</Video>
<Video>
<Name>video_720</Name>
<Codec>h264</Codec>
<Profile>high</Profile>
<Bitrate>1500000</Bitrate>
<Framerate>30</Framerate>
<Width>1280</Width>
<Height>720</Height>
<KeyFrameInterval>30</KeyFrameInterval>
<Preset>medium</Preset>
<BFrames>2</BFrames>
<ThreadCount>4</ThreadCount>
</Video>
<Video>
<Name>video_1080</Name>
<Codec>h264</Codec>
<Bitrate>6000000</Bitrate>
<Framerate>30</Framerate>
<Width>1920</Width>
<Height>1080</Height>
<KeyFrameInterval>30</KeyFrameInterval>
<ThreadCount>8</ThreadCount>
<Preset>medium</Preset>
<BFrames>0</BFrames>
</Video>
</Encodes>
</OutputProfile><HLS>
...
<DVR>
<Enable>true</Enable>
<TempStoragePath>/tmp/ome_dvr/</TempStoragePath>
<MaxDuration>3600</MaxDuration>
</DVR>
...
</HLS>Content-Type: application/jsonAuthorization: Basic {credentials}
Content-Type: application/json
# Authorization
Credentials for HTTP Basic Authentication created with <AccessToken>Content-Type: application/jsonWWW-Authenticate: Basic realm=”OvenMediaEngine”Content-Type: application/json<HLSDumpInfo>
<UserData>~~~</UserData>
<Stream>/default/app/stream</Stream>
<Status>Running | Completed | Error </Status>
<Items>
<Item>
<Seq>0</Seq>
<Time>~~~</Time>
<File>~~~</File>
</Item>
...
<Item>
<Seq>1</Seq>
<Time>~~~</Time>
<File>/tmp/abc/xxx/298182/chunklist_0_video_llhls.m3u8</File>
</Item>
...
<Item>
<Seq>2</Seq>
<Time>~~~</Time>
<File>chunklist_0_video_llhls.m3u8</File>
</Item>
</Items>
</HLSDumpInfo>{
"statusCode": 404,
"message": "Could not find the application: [default/non-exists] (404)"
}{
"outputStreamName": "stream",
"id": "dump_id"
}
# outputStreamName (required)
The name of the output stream created with OutputProfile.
# id (optional)
This is the id passed when calling the startHlsDump API.
If id is not passed, all dump in progress at outputStreamName is aborted.{
"statusCode": 200,
"message": "OK",
"response": [
"stream",
"stream2"
]
}
# statusCode
Same as HTTP Status Code
# message
A human-readable description of the response code
# response
Json array containing a list of stream names{
"message": "[HTTP] Authorization header is required to call API (401)",
"statusCode": 401
}{
"statusCode": 404,
"message": "Could not find the application: [default/non-exists] (404)"
}<Applications>
<Application>
<Name>app</Name>
<!-- Application type (live/vod) -->
<Type>live</Type>
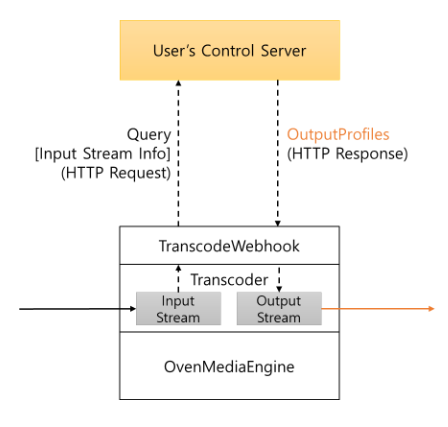
<TranscodeWebhook>
<Enable>true</Enable>
<ControlServerUrl>http://example.com/webhook</ControlServerUrl>
<SecretKey>abc123!@#</SecretKey>
<Timeout>1500</Timeout>
<UseLocalProfilesOnConnectionFailure>true</UseLocalProfilesOnConnectionFailure>
<UseLocalProfilesOnServerDisallow>false</UseLocalProfilesOnServerDisallow>
<UseLocalProfilesOnErrorResponse>false</UseLocalProfilesOnErrorResponse>
</TranscodeWebhook>POST /configured/target/url/ HTTP/1.1
Content-Length: 944
Content-Type: application/json
Accept: application/json
X-OME-Signature: f871jd991jj1929jsjd91pqa0amm1
{
"source" : "TCP://192.168.0.200:8843",
"stream" :
{
"name" : "stream",
"virtualHost" : "default",
"application" : "app",
"sourceType" : "Rtmp",
"createdTime" : "2023-10-24T18:10:51.120+09:00",
"sourceUrl" : "TCP://192.168.0.200:8843",
"tracks" :
[
{
"id" : 0,
"name" : "Video",
"type" : "Video",
"video" :
{
"bitrate" : "2500000",
"bypass" : false,
"codec" : "H264",
"framerate" : 30.0,
"hasBframes" : false,
"height" : 720,
"keyFrameInterval" : 0,
"width" : 1280
}
},
{
"audio" :
{
"bitrate" : "160000",
"bypass" : false,
"channel" : 2,
"codec" : "AAC",
"samplerate" : 44100
},
"id" : 1,
"name" : "Audio",
"type" : "Audio"
},
{
"id" : 2,
"name" : "Data",
"type" : "Data"
}
]
}
}HTTP/1.1 200 OK
Content-Length: 102
Content-Type: application/json
Connection: Closed
{
"allowed": true,
"reason": "it will be output to the log file when "allowed" is false",
"outputProfiles" : {
"hardwareAcceleration": true,
"outputProfile":[
{
"name": "bypass",
"outputStreamName": "${OriginStreamName}",
"playlists": [
{
"name": "default",
"fileName": "default",
"renditions":[
{
"name": "bypass",
"video": "bypass_video",
"audio": "bypass_audio"
}
]
}
],
"encodes": {
"videos": [
{
"name": "bypass_video",
"bypass": true
}
],
"audios": [
{
"name": "bypass_audio",
"bypass": true
}
]
}
}
]
}
}"outputProfiles": {
"hardwareAcceleration": true,
"outputProfile": [
{
"name": "bypass",
"outputStreamName": "${OriginStreamName}",
"encodes": {
"audios": [
{
"name": "bypass_audio",
"bypass": true,
"active": true,
"codec": "",
"bitrate": "",
"samplerate": 0,
"channel": 0,
"bypassIfMatch": {
"codec": "",
"bitrate": "",
"framerate": "",
"width": "",
"height": "",
"sar": "",
"samplerate": "",
"channel": ""
}
}
],
"videos": [
{
"name": "bypass_video",
"bypass": true,
"active": true,
"codec": "",
"profile": "",
"bitrate": "",
"width": 0,
"height": 0,
"framerate": 0.000000,
"preset": "",
"threadCount": -1,
"keyFrameInterval": 0,
"bFrames": 0,
"bypassIfMatch": {
"codec": "",
"bitrate": "",
"framerate": "",
"width": "",
"height": "",
"sar": "",
"samplerate": "",
"channel": ""
}
}
],
"images": [
{
"name": "bypass_video",
"bypass": true,
"active": true,
"codec": "",
"width": 0,
"height": 0,
"framerate": 0.000000
}
]
},
"playlists": [
{
"name": "default",
"fileName": "default",
"options": {
"webRtcAutoAbr": true,
"hlsChunklistPathDepth": -1
},
"rendition/renditions": [
{
"name/name": "bypass",
"video/video": "bypass_video",
"audio/audio": "bypass_audio"
}
]
}
]
}
]
}<Server version="5">
<Bind>
<Publishers>
<OVT>
<Port>9000</Port>
</OVT>
</Publishers>
</Bind>
<VirtualHosts>
<VirtualHost>
<Applications>
<Application>
...
<Publishers>
<OVT />
</Publishers>
</Application>
</Applications>
</VirtualHost>
</VirtualHosts>
</Server><VirtualHosts>
<VirtualHost>
<Origins>
<Properties>
<NoInputFailoverTimeout>3000</NoInputFailoverTimeout>
<UnusedStreamDeletionTimeout>60000</UnusedStreamDeletionTimeout>
</Properties>
<Origin>
<Location>/app/stream</Location>
<Pass>
<Scheme>ovt</Scheme>
<Urls><Url>origin.com:9000/app/stream_720p</Url></Urls>
</Pass>
<ForwardQueryParams>true</ForwardQueryParams>
</Origin>
<Origin>
<Location>/app/</Location>
<Pass>
<Scheme>OVT</Scheme>
<Urls><Url>origin.com:9000/app/</Url></Urls>
</Pass>
</Origin>
<Origin>
<Location>/</Location>
<Pass>
<Scheme>RTSP</Scheme>
<Urls><Url>origin2.com:9000/</Url></Urls>
</Pass>
</Origin>
</Origins>
</VirtualHost>
</VirtualHosts><Location>/edge_app/</Location>
<Pass>
<Scheme>ovt</Scheme>
<Urls><Url>origin.com:9000/origin_app/</Url></Urls>
</Pass><VirtualHost>
...
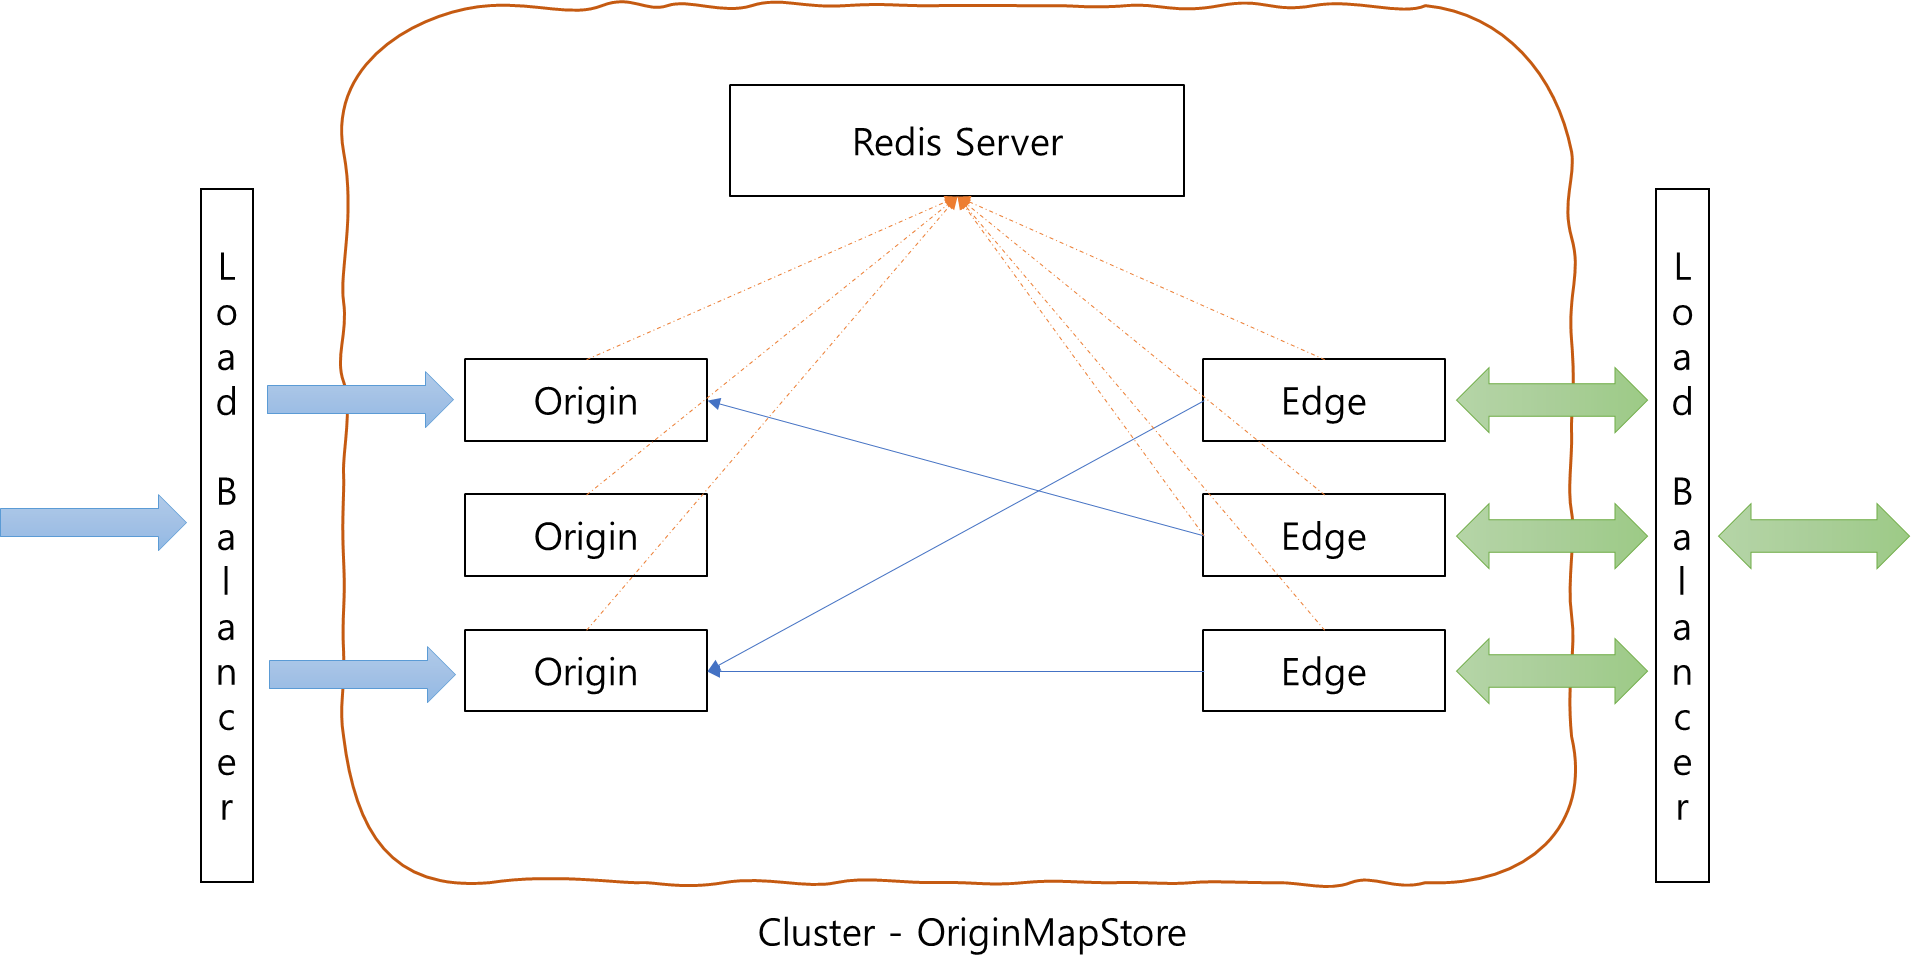
<OriginMapStore>
<!-- In order to use OriginMap, you must enable OVT Publisher in Origin and OVT Provider in Edge. -->
<RedisServer>
<Host>192.168.0.160:6379</Host>
<Auth>!@#ovenmediaengine</Auth>
</RedisServer>
<!-- This is only needed for the origin server and used to register the ovt address of the stream. -->
<OriginHostName>ome-dev.airensoft.com</OriginHostName>
</OriginMapStore>
...
</VirtualHost><Applications>
<Application>
<Name>*</Name>
<Type>live</Type>
<OutputProfiles>
...
</OutputProfiles>
<Providers>
<OVT />
</Providers>
<Publishers>
<AppWorkerCount>1</AppWorkerCount>
<StreamWorkerCount>8</StreamWorkerCount>
<WebRTC>
<Timeout>30000</Timeout>
<Rtx>false</Rtx>
<Ulpfec>false</Ulpfec>
<JitterBuffer>false</JitterBuffer>
</WebRTC>
<LLHLS>
<ChunkDuration>0.5</ChunkDuration>
<SegmentDuration>6</SegmentDuration>
<SegmentCount>10</SegmentCount>
<CrossDomains>
<Url>*</Url>
</CrossDomains>
</LLHLS>
</Publishers>
</Application>
</Applications>
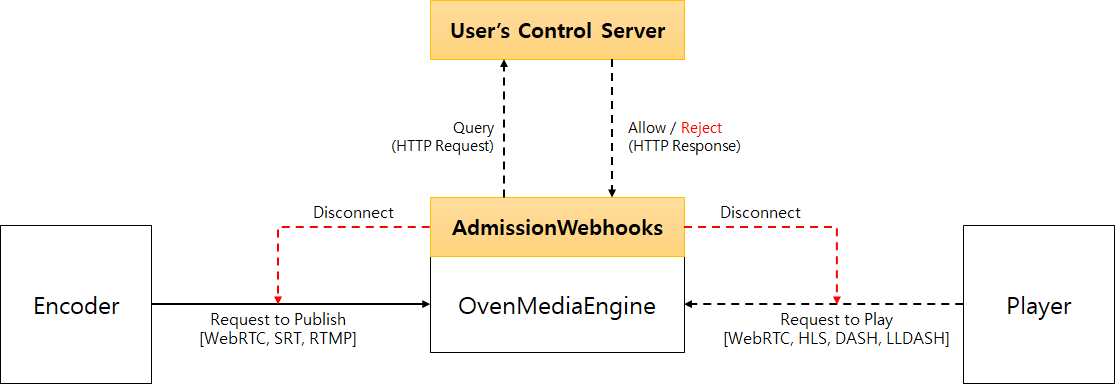
<VirtualHost>
<AdmissionWebhooks>
<ControlServerUrl>https://192.168.0.161:9595/v1/admission</ControlServerUrl>
<SecretKey>1234</SecretKey>
<Timeout>3000</Timeout>
<Enables>
<Providers>rtmp,webrtc,srt</Providers>
<Publishers>webrtc,llhls,thumbnail</Publishers>
</Enables>
</AdmissionWebhooks>
</VirtualHost>POST /configured/target/url/ HTTP/1.1
Content-Length: 325
Content-Type: application/json
Accept: application/json
X-OME-Signature: f871jd991jj1929jsjd91pqa0amm1
{
"client":
{
"address": "211.233.58.86",
"port": 29291,
"real_ip": "192.0.2.43",
"user_agent": "Mozilla/5.0 (Windows NT 10.0; Win64; x64) AppleWebKit/537.36 (KHTML, like Gecko) Chrome/110.0.0.0 Safari/537.36"
},
"request":
{
"direction": "incoming | outgoing",
"protocol": "webrtc | rtmp | srt | llhls | thumbnail",
"status": "opening | closing",
"url": "scheme://host[:port]/app/stream/file?query=value&query2=value2",
"new_url": "scheme://host[:port]/app/new_stream/file?query=value&query2=value2",
"time": "2021-05-12T13:45:00.000Z"
}
}HTTP/1.1 200 OK
Content-Length: 5
Content-Type: application/json
Connection: Closed
{
}HTTP/1.1 200 OK
Content-Length: 102
Content-Type: application/json
Connection: Closed
{
"allowed": true,
"new_url": "scheme://host[:port]/app/stream/file?query=value&query2=value2",
"lifetime": milliseconds,
"reason": "authorized"
}
Authorization: Basic {credentials}
# Authorization
Credentials for HTTP Basic Authentication created with <AccessToken>{
"id": "{unique_push_id}",
{
"id": "{unique_push_id}",
{
"id": "{unique_push_id}",
{
"message": "[HTTP] Could not find the application: [vhost/app1] (404)",
"statusCode": 404
}Authorization: Basic {credentials}
# Authorization
Credentials for HTTP Basic Authentication created with <AccessToken>{
"id": "{unique_push_id}"
}
# id (required)
unique ID to identify the push publishing taskContent-Type: application/json{
"statusCode": 200,
"message": "OK",
}
# statusCode
Same as HTTP Status Code
# message
A human-readable description of the response codeWWW-Authenticate: Basic realm=”OvenMediaEngine”{
"message": "[HTTP] Authorization header is required to call API (401)",
"statusCode": 401
}{
"message": "[HTTP] Could not find the application: [vhost/app1] (404)",
"statusCode": 404
}Authorization: Basic {credentials}
# Authorization
Credentials for HTTP Basic Authentication created with <AccessToken>{
"id": "{unique_push_id}"
}
# id (optional)
unique ID to identify the push publishing task. If no id is given in the request, the full list is returned.Content-Type: application/json{
"statusCode": 200,
"message": "OK",
"response": [
{
"id": "{unique_push_id}",
"state": "started",
"vhost": "default",
"app": "app",
"stream": {
"name": "{output_stream_name}",
"trackIds": [],
"variantNames": []
},
"protocol": "rtmp",
"url": "rtmp://{host}[:port]/{app_name}",
"streamKey": "{stream_name}",
"sentBytes": 0,
"sentTime": 0,
"sequence": 0,
"totalsentBytes": 0,
"totalsentTime": 0,
"createdTime": "2023-03-15T23:02:34.371+09:00",
"startTime": "1970-01-01T09:00:00.000+09:00",
"finishTime": "1970-01-01T09:00:00.000+09:00"
},
{
"id": "4",
...
}
]
}
# statusCode
Same as HTTP Status Code
# message
A human-readable description of the response code
# response
Information of recording tasks. If there is no recording task,
response with empty array ("response": [])WWW-Authenticate: Basic realm=”OvenMediaEngine”{
"message": "[HTTP] Authorization header is required to call API (401)",
"statusCode": 401
}{
"message": "[HTTP] Could not find the application: [vhost/app1] (404)",
"statusCode": 404
}<Server version="8">
<Alert>
<Url>http://192.168.0.161:9595/alert/notification</Url>
<SecretKey>1234</SecretKey>
<Timeout>3000</Timeout>
<Rules>
<Ingress>
<MinBitrate>2000000</MinBitrate>
<MaxBitrate>4000000</MaxBitrate>
<MinFramerate>15</MinFramerate>
<MaxFramerate>60</MaxFramerate>
<MinWidth>1280</MinWidth>
<MinHeight>720</MinHeight>
<MaxWidth>1920</MaxWidth>
<MaxHeight>1080</MaxHeight>
<MinSamplerate>16000</MinSamplerate>
<MaxSamplerate>50400</MaxSamplerate>
<LongKeyFrameInterval />
<HasBFrames />
</Ingress>
</Rules>
</Alert>
</Server>POST /configured/target/url/ HTTP/1.1
Content-Length: 1037
Content-Type: application/json
Accept: application/json
X-OME-Signature: f871jd991jj1929jsjd91pqa0amm1
{
"sourceUri":"#default#app/stream",
"messages":[
{
"code":"INGRESS_HAS_BFRAME",
"description":"There are B-Frames in the ingress stream."
},
{
"code":"INGRESS_BITRATE_LOW",
"description":"The ingress stream's current bitrate (316228 bps) is lower than the configured bitrate (2000000 bps)"
}
],
"sourceInfo":{
"createdTime":"2023-04-07T21:15:24.487+09:00",
"sourceType":"Rtmp",
"sourceUrl":"TCP://192.168.0.220:10639",
"tracks":[
{
"id":0,
"name":"Video",
"type":"Video",
"video":{
"bitrate":"300000",
"bypass":false,
"codec":"H264",
"framerate":30.0,
"hasBframes":true,
"height":1080,
"keyFrameInterval":0,
"width":1920
}
},
{
"audio":{
"bitrate":"160000",
"bypass":false,
"channel":1,
"codec":"AAC",
"samplerate":48000
},
"id":1,
"name":"Audio",
"type":"Audio"
},
{
"id":2,
"name":"Data",
"type":"Data"
}
]
},
"type":"INGRESS"
}HTTP/1.1 200 OK
Content-Length: 5
Content-Type: application/json
Connection: Closed
{
}Content-Type: application/jsonAuthorization: Basic {credentials}
# Authorization
Credentials for HTTP Basic Authentication created with <AccessToken>WWW-Authenticate: Basic realm=”OvenMediaEngine”{
"message": "[HTTP] Could not find the application: [vhost/app1] (404)",
"statusCode": 404
}{
"statusCode": 200,
{
"message": "[HTTP] Authorization header is required to call API (401)",
curl -OL 'https://raw.githubusercontent.com/AirenSoft/OvenMediaEngine/master/misc/ome_docker_launcher.sh' && chmod +x ome_docker_launcher.sh$ curl -OL 'https://raw.githubusercontent.com/AirenSoft/OvenMediaEngine/master/misc/ome_docker_launcher.sh' && chmod +x ome_docker_launcher.sh
$ ./ome_docker_launcher.sh -h
▄██████▀███▄
█████▀ ▄██████ OvenMediaEngine Launcher v0.1
███▄▄▄▄▀▀▀▀███
██████▀ ▄█████ https://github.com/AirenSoft/OvenMediaEngine
▀███▄██████▀
• Usage: ./ome_docker_launcher.sh [OPTIONS] COMMAND ...
• Options:
-h, --help Show this help message and exit
-v, --version Show the version and exit
-d, --debug Show debug log
-b, --hide_banner Hide the banner
-m, --monochrome Disable colors
• Commands:
setup Download the latest Docker image and setup directories for the container
start Start a docker container
sh Run a shell in the docker container
status Show the status of the docker container
stop Stop the docker container
restart Restart the docker container• Usage: ./ome_docker_launcher.sh [OPTIONS] COMMAND ...
• Options:
-h, --help Show this help message and exit
-v, --version Show the version and exit
-d, --debug Show debug log
-b, --hide_banner Hide the banner
-m, --monochrome Disable colors
• Commands:
setup Download the latest Docker image and setup directories for the container
start Start a docker container
sh Run a shell in the docker container
status Show the status of the docker container
stop Stop the docker container
restart Restart the docker container$ ./ome_docker_launcher.sh setup
▄██████▀███▄
█████▀ ▄██████ OvenMediaEngine Launcher v0.1
███▄▄▄▄▀▀▀▀███
██████▀ ▄█████ https://github.com/AirenSoft/OvenMediaEngine
▀███▄██████▀
• Creating configuration directory /usr/share/ovenmediaengine/conf
• Copying configuration to /usr/share/ovenmediaengine/conf
• Copying logs directory
• Copying crash dump directory
• OvenMediaEngine is ready to start!
If you want to change the settings, please modify /usr/share/ovenmediaengine/conf/Server.xml
If you want to start OvenMediaEngine, please run ./ome_docker_launcher.sh start$ ./ome_docker_launcher.sh start
▄██████▀███▄
█████▀ ▄██████ OvenMediaEngine Launcher v0.1
███▄▄▄▄▀▀▀▀███
██████▀ ▄█████ https://github.com/AirenSoft/OvenMediaEngine
▀███▄██████▀
• Starting OvenMediaEngine...
• Obtaining the port list from /usr/share/ovenmediaengine/conf/Server.xml
- RTMP Provider is configured to use 1935 (Port)
- SRT Provider is configured to use 9999 (Port)
- WebRTC Provider is configured to use 3333 (Port)
- WebRTC Provider is configured to use 3334 (TLSPort)
- WebRTC Provider is configured to use 10000-10004/UDP (IceCandidate)
- WebRTC Provider is configured to use 3478 (TcpRelay)
- OVT Publisher is configured to use 9000 (Port)
- LLHLS Publisher is configured to use 3333 (Port)
- LLHLS Publisher is configured to use 3334 (TLSPort)
- WebRTC Publisher is configured to use 3333 (Port)
- WebRTC Publisher is configured to use 3334 (TLSPort)
- WebRTC Publisher is configured to use 10000-10004/UDP (IceCandidate)
- WebRTC Publisher is configured to use 3478 (TcpRelay)
• Starting a container: ovenemediaengine
docker> 7235ff9f80762b6e7b27ba3a9773f5584033d55c113340dabf0779e8f5cf53bb
• OvenMediaEngine is started successfully!$ OME_HOST_IP=1.2.3.4 ./ome_docker_launcher.sh start
...
• OvenMediaEngine is started successfully!
$ tail -f /usr/share/ovenmediaengine/logs/ovenmediaengine.log
...
[2023-11-01 00:00:00.000] I [OvenMediaEngine:1] ICE | ice_port_manager.cpp:305 | ICE candidate found: 1.2.3.4:40000
...OME_HOST_IP
OME_RTMP_PROV_PORT
OME_WEBRTC_CANDIDATE_IP
OME_WEBRTC_CANDIDATE_PORT
OME_WEBRTC_SIGNALLING_PORT
OME_WEBRTC_SIGNALLING_TLS_PORT
OME_WEBRTC_TCP_RELAY_PORT$ ./ome_docker_launcher.sh sh
▄██████▀███▄
█████▀ ▄██████ OvenMediaEngine Launcher v0.1
███▄▄▄▄▀▀▀▀███
██████▀ ▄█████ https://github.com/AirenSoft/OvenMediaEngine
▀███▄██████▀
• Run a shell in the running container: ID: 7235ff9f8076
root@7235ff9f8076:/opt/ovenmediaengine/bin# ps -ef
UID PID PPID C STIME TTY TIME CMD
root 1 0 0 10:29 ? 00:00:01 /opt/ovenmediaengine/bin/OvenMediaEngine -c origin_conf
root 53 0 0 10:44 pts/0 00:00:00 /bin/bash
root 61 53 0 10:44 pts/0 00:00:00 ps -ef
root@7235ff9f8076:/opt/ovenmediaengine/bin# top -bn1
top - 10:44:44 up 333 days, 3:33, 0 users, load average: 0.44, 0.78, 0.78
Tasks: 3 total, 1 running, 2 sleeping, 0 stopped, 0 zombie
%Cpu(s): 1.4 us, 0.3 sy, 0.0 ni, 98.3 id, 0.0 wa, 0.0 hi, 0.0 si, 0.0 st
MiB Mem : 128723.7 total, 10529.4 free, 31268.5 used, 86925.7 buff/cache
MiB Swap: 31250.0 total, 30345.8 free, 904.2 used. 96221.5 avail Mem
PID USER PR NI VIRT RES SHR S %CPU %MEM TIME+ COMMAND
1 root 20 0 320136 21812 15772 S 0.0 0.0 0:01.48 OvenMediaEngine
53 root 20 0 4116 3456 2896 S 0.0 0.0 0:00.01 bash
62 root 20 0 5972 3160 2732 R 0.0 0.0 0:00.00 top
root@7235ff9f8076:/opt/ovenmediaengine/bin# $ ./ome_docker_launcher.sh status
▄██████▀███▄
█████▀ ▄██████ OvenMediaEngine Launcher v0.1
███▄▄▄▄▀▀▀▀███
██████▀ ▄█████ https://github.com/AirenSoft/OvenMediaEngine
▀███▄██████▀
• Container is running: ID: 7235ff9f8076, name: ovenemediaengine$ ./ome_docker_launcher.sh stop
▄██████▀███▄
█████▀ ▄██████ OvenMediaEngine Launcher v0.1
███▄▄▄▄▀▀▀▀███
██████▀ ▄█████ https://github.com/AirenSoft/OvenMediaEngine
▀███▄██████▀
• Stopping a container: ovenemediaengine
docker> ovenemediaengine
• Removing a container: ovenemediaengine
docker> ovenemediaengine
• OvenMediaEngine is stopped successfully$ ./ome_docker_launcher.sh stop
▄██████▀███▄
█████▀ ▄██████ OvenMediaEngine Launcher v0.1
███▄▄▄▄▀▀▀▀███
██████▀ ▄█████ https://github.com/AirenSoft/OvenMediaEngine
▀███▄██████▀
• Restarting a container: ovenemediaengine
docker> ovenemediaengine$ ./ome_docker_launcher.sh -d stop
▄██████▀███▄
█████▀ ▄██████ OvenMediaEngine Launcher v0.1
███▄▄▄▄▀▀▀▀███
██████▀ ▄█████ https://github.com/AirenSoft/OvenMediaEngine
▀███▄██████▀
• Stopping a container: ovenemediaengine
┌── /usr/bin/docker stop ovenemediaengine
docker> ovenemediaengine
└── Succeeded
• Removing a container: ovenemediaengine
┌── /usr/bin/docker rm ovenemediaengine
docker> ovenemediaengine
└── Succeeded
• OvenMediaEngine is stopped successfully<Server version="8">
<Bind>
<Publishers>
<LLHLS>
<!--
OME only supports h2, so LLHLS works over HTTP/1.1 on non-TLS ports.
LLHLS works with higher performance over HTTP/2,
so it is recommended to use a TLS port.
-->
<Port>80</Port>
<TLSPort>443</TLSPort>
<WorkerCount>1</WorkerCount>
</LLHLS>
</Publishers>
</Bind>
<VirtualHosts>
<VirtualHost>
<Applications>
<Application>
<Publishers>
<LLHLS>
<ChunkDuration>0.2</ChunkDuration>
<SegmentDuration>6</SegmentDuration>
<SegmentCount>10</SegmentCount>
<CrossDomains>
<Url>*</Url>
</CrossDomains>
</LLHLS>
</Publishers>
</Application>
</Applications>
</VirtualHost>
</VirtualHosts>
</Server><OutputProfiles>
<OutputProfile>
<Name>bypass_stream</Name>
<OutputStreamName>${OriginStreamName}</OutputStreamName>
<Encodes>
<Audio>
<Bypass>true</Bypass>
</Audio>
<Video>
<Bypass>true</Bypass>
</Video>
</Encodes>
</OutputProfile>
</OutputProfiles><LLHLS>
...
<DVR>
<Enable>true</Enable>
<TempStoragePath>/tmp/ome_dvr/</TempStoragePath>
<MaxDuration>3600</MaxDuration>
</DVR>
...
</LLHLS><LLHLS>
<Dumps>
<Dump>
<Enable>true</Enable>
<TargetStreamName>stream*</TargetStreamName>
<Playlists>
<Playlist>llhls.m3u8</Playlist>
<Playlist>abr.m3u8</Playlist>
</Playlists>
<OutputPath>/service/www/ome-dev.airensoft.com/html/${VHostName}_${AppName}_${StreamName}/${YYYY}_${MM}_${DD}_${hh}_${mm}_${ss}</OutputPath>
</Dump>
</Dumps>
...
</LLHLS><LLHLS>
<ChunkDuration>0.5</ChunkDuration>
<PartHoldBack>1.5</PartHoldBack>
<SegmentDuration>6</SegmentDuration>
<SegmentCount>10</SegmentCount>
<DRM>
<Enable>false</Enable>
<InfoFile>path/to/file.xml</InfoFile>
</DRM>
<CrossDomains>
<Url>*</Url>
</CrossDomains>
</LLHLS><?xml version="1.0" encoding="UTF-8"?>
<DRMInfo>
<DRM>
<Name>MultiDRM</Name>
<VirtualHostName>default</VirtualHostName>
<ApplicationName>app</ApplicationName>
<StreamName>stream*</StreamName> <!-- Can be a wildcard regular expression -->
<CencProtectScheme>cbcs</CencProtectScheme> <!-- Currently supports cbcs only -->
<KeyId>572543f964e34dc68ba9ba9ef91d4xxx</KeyId> <!-- Hexadecimal -->
<Key>16cf4232a86364b519e1982a27d90xxx</Key> <!-- Hexadecimal -->
<Iv>572547f914e34dc68ba9ba9ef91d4xxx</Iv> <!-- Hexadecimal -->
<Pssh>0000003f7073736800000000edef8ba979d64acea3c827dcd51d21ed0000001f1210572547f964e34dc68ba9ba9ef91d4c4a1a05657a64726d48f3c6899xxx</Pssh> <!-- Hexadecimal, for Widevine -->
<!-- Add Pssh for FairPlay if needed -->
<FairPlayKeyUrl>skd://fiarplay_key_url</FairPlayKeyUrl> <!-- FairPlay only -->
</DRM>
<DRM>
<Name>MultiDRM2</Name>
<VirtualHostName>default</VirtualHostName>
<ApplicationName>app2</ApplicationName>
<StreamName>stream*</StreamName> <!-- Can be a wildcard regular expression -->
...........
</DRM>
</DRMInfo><?xml version="1.0" encoding="UTF-8"?>
<DRMInfo>
<DRM>
<Name>Pallycon</Name>
<VirtualHostName>default</VirtualHostName>
<ApplicationName>app</ApplicationName>
<StreamName>stream*</StreamName> <!-- Can be wildcard regular expression -->
<DRMProvider>Pallycon</DRMProvider> <!-- Manual(default), Pallycon -->
<DRMSystem>Widevine,Fairplay</DRMSystem> <!-- Widevine, Fairplay -->
<CencProtectScheme>cbcs</CencProtectScheme> <!-- cbcs, cenc -->
<ContentId>${VHostName}_${AppName}_${StreamName}</ContentId>
<KMSUrl>https://kms.pallycon.com/v2/cpix/pallycon/getKey/</KMSUrl>
<KMSToken>xxxx</KMSToken>
</DRM>
</DRMInfo>Authorization: Basic {credentials}
# Authorization
Credentials for HTTP Basic Authentication created with <AccessToken>Content-Type: application/jsonContent-Type: application/jsonWWW-Authenticate: Basic realm=”OvenMediaEngine”{
"message": "[HTTP] Could not find the application: [vhost/app1] (404)",
"statusCode": 404
}Authorization: Basic {credentials}
# Authorization
Credentials for HTTP Basic Authentication created with <AccessToken>Content-Type: application/jsonWWW-Authenticate: Basic realm=”OvenMediaEngine”{
"message": "[HTTP] Could not find the application: [vhost/app1] (404)",
"statusCode": 404
}Authorization: Basic {credentials}
# Authorization
Credentials for HTTP Basic Authentication created with <AccessToken>Content-Type: application/jsonWWW-Authenticate: Basic realm=”OvenMediaEngine”{
"message": "[HTTP] Could not find the application: [vhost/app1] (404)",
"statusCode": 404
}[
{
"name": "bypass_profile",
"outputStreamName": "${OriginStreamName}_bypass",
"encodes": {
"videos": [
{
"bypass": true
}
],
"audios": [
{
"bypass": true
}
]
}
}
]
# name (required)
The name of the output profile. cannot be duplicated
# outputStreamName (required)
The name of the output stream to be created through this profile.
# encodes (required)
encode profile list. It must have videos or audios, and must have at least one item.[
{
"statusCode": 200,
"message": "OK",
"response": {
"name": "bypass_profile",
"outputStreamName": "${OriginStreamName}_bypass",
"encodes": {
"audios": [],
"videos": [
{
"bypass": true
}
]
}
},
{
"statusCode": 200,
"message": "OK",
"response": {
...
}
}
}
# statusCode
Same as HTTP Status Code
# message
A human-readable description of the response code
# response
Created output profile information[
{
"statusCode": 200,
"message": "OK",
"response": {
"name": "app",
"outputProfiles": {
...
"providers": {
"ovt": {},
"rtmp": {},
...
},
{
"statusCode": 409,
"message": "Conflict",
"response": {
...
}
}
}
# statusCode
Same as HTTP Status Code
# message
A human-readable description of the response code
# response
Output profile information created when statusCode is 200{
"message": "[HTTP] Authorization header is required to call API (401)",
"statusCode": 401
}{
"statusCode": 200,
"message": "OK",
"response": {
"name": "bypass_profile2",
"outputStreamName": "${OriginStreamName}_bypass"
"encodes": {
"audios": [],
"videos": [
{
"bypass": true
}
]
}
}
}
# statusCode
Same as HTTP Status Code
# message
A human-readable description of the response code
# response
Output Profile information{
"message": "[HTTP] Authorization header is required to call API (401)",
"statusCode": 401
}{
"message": "OK",
"statusCode": 200
}
# statusCode
Same as HTTP Status Code
# message
A human-readable description of the response code{
"message": "[HTTP] Authorization header is required to call API (401)",
"statusCode": 401
}{
"message": "[HTTP] Could not find the application: [vhost/app1] (404)",
"statusCode": 404
}Authorization: Basic {credentials}
# Authorization
Credentials for HTTP Basic Authentication created with <AccessToken>Content-Type: application/jsonWWW-Authenticate: Basic realm=”OvenMediaEngine”{
"message": "[HTTP] Could not find the application: [vhost/app1] (404)",
"statusCode": 404
}Authorization: Basic {credentials}
# Authorization
Credentials for HTTP Basic Authentication created with <AccessToken>Content-Type: application/jsonWWW-Authenticate: Basic realm=”OvenMediaEngine”{
"message": "[HTTP] Could not find the application: [vhost/app1] (404)",
"statusCode": 404
}Content-Type: application/json{
"statusCode": 404,
"message": "Could not find the application: [default/non-exists] (404)"
}Authorization: Basic {credentials}
Content-Type: application/json
# Authorization
Credentials for HTTP Basic Authentication created with <AccessToken>{
"outputStream": {
"name": "stream"
},
"sourceStreams": [
{
"name": "input1",
"url": "stream://default/app/input1",
"trackMap": [
{
"sourceTrackName": "bypass_video",
"newTrackName": "input1_video",
"bitrateConf": 5000000,
"framerateConf": 30
},
{
"sourceTrackName": "bypass_audio",
"newTrackName": "input1_audio",
"bitrateConf": 128000
}
]
},
{
"name": "input2",
"url": "stream://default/app/input2",
"trackMap": [
{
"sourceTrackName": "bypass_video",
"newTrackName": "input2_video",
"bitrateConf": 1000000,
"framerateConf": 30
},
{
"sourceTrackName": "bypass_audio",
"newTrackName": "input2_audio",
"bitrateConf": 128000
}
]
}
],
"playlists": [
{
"name": "LLHLS ABR",
"fileName": "abr",
"options": {
"webrtcAutoAbr": true,
"hlsChunklistPathDepth": 0
},
"renditions": [
{
"name": "input1",
"video": "input1_video",
"audio": "input1_audio"
},
{
"name": "input2",
"video": "input2_video",
"audio": "input2_audio"
}
]
}
]
}Content-Type: application/json{
"message": "Created",
"statusCode": 201
}
# statusCode
Same as HTTP Status Code
# message
A human-readable description of the response codeWWW-Authenticate: Basic realm=”OvenMediaEngine”{
"message": "[HTTP] Authorization header is required to call API (401)",
"statusCode": 401
}{
"statusCode": 404,
"message": "Could not find the application: [default/non-exists] (404)"
}Authorization: Basic {credentials}
# Authorization
Credentials for HTTP Basic Authentication created with <AccessToken>Content-Type: application/json{
"message": "OK",
"statusCode": 200,
"response": {
"state": "Pulling",
"pullingMessage": "Multiplex Channel : #default#app/stream: Wait for stream input1",
"outputStream": {
"name": "stream"
},
"playlists": [
{
"fileName": "abr",
"name": "LLHLS ABR",
"options": {
"hlsChunklistPathDepth": 0,
"webrtcAutoAbr": true
},
"renditions": [
{
"audio": "input1_audio",
"name": "input1",
"video": "input1_video"
},
{
"audio": "input2_audio",
"name": "input2",
"video": "input2_video"
}
]
}
],
"sourceStreams": [
{
"name": "input1",
"trackMap": [
{
"bitrateConf": 128000,
"newTrackName": "input1_audio",
"sourceTrackName": "bypass_audio"
},
{
"bitrateConf": 5000000,
"framerateConf": 30,
"newTrackName": "input1_video",
"sourceTrackName": "bypass_video"
}
],
"url": "stream://default/app/input1"
},
{
"name": "input2",
"trackMap": [
{
"bitrateConf": 128000,
"newTrackName": "input2_audio",
"sourceTrackName": "bypass_audio"
},
{
"bitrateConf": 1000000,
"framerateConf": 30,
"newTrackName": "input2_video",
"sourceTrackName": "bypass_video"
}
],
"url": "stream://default/app/input2"
}
]
}
}WWW-Authenticate: Basic realm=”OvenMediaEngine”{
"message": "[HTTP] Authorization header is required to call API (401)",
"statusCode": 401
}Content-Type: application/json{
"statusCode": 404,
"message": "Could not find the application or stream (404)"
}Authorization: Basic {credentials}
# Authorization
Credentials for HTTP Basic Authentication created with <AccessToken>Content-Type: application/json{
"statusCode": 200,
"message": "OK",
}
# statusCode
Same as HTTP Status Code
# message
A human-readable description of the response codeWWW-Authenticate: Basic realm=”OvenMediaEngine”{
"message": "[HTTP] Authorization header is required to call API (401)",
"statusCode": 401
}Content-Type: application/json{
"message": "[HTTP] Could not find the stream: [default/#default#app/stream] (404)",
"statusCode": 404
}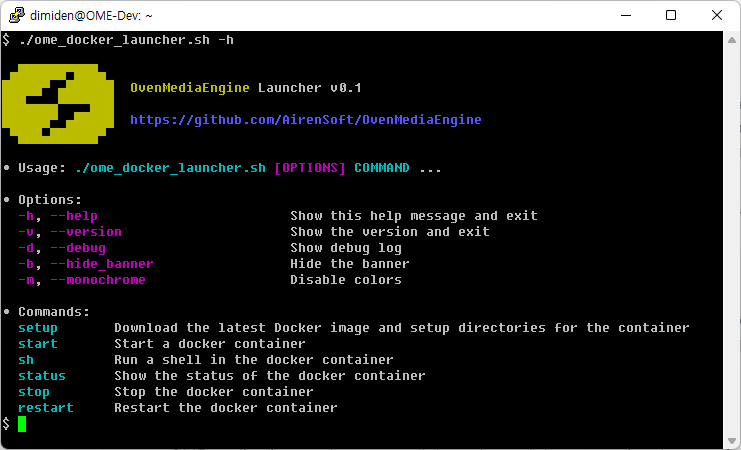
{
"id": "{unique_record_id}",
"stream": {
"name": "{output_stream_name}",
"variantNames": []
}
}
# id (required)
unique ID to identify the recording task
# stream (required)
## name (required)
output stream name
## variantNames (optional)
Array of track names to record. If empty, all tracks will be
recorded. This value is Encodes.[Video|Audio|Data].Name in the
OutputProfile setting.{
"id": "{unique_record_id}",
"stream": {
"name": "{output_stream_name}"
},
"interval": 60000,
"segmentationRule": "discontinuity"
}
# id (required)
unique ID to identify the recording task
# stream (required)
## name (required)
output stream name
## variantNames (optional)
Array of track names to record. If empty, all tracks will be
recorded. This value is Encodes.[Video|Audio|Data].Name in the
OutputProfile setting.
# interval (optional)
Recording time per file (milliseconds). Not allowed to use with schedule
# segmentationRule (optional)
Define the policy for continuously or discontinuously timestamp
in divided recorded files.
continuity : timestamp of recorded files is continuous
discontinuity(default) : timestamp starts anew for each recorded file{
"id": "{unique_record_id}",
"stream": {
"name": "{output_stream_name}"
},
"schedule" : "0 */1 *"
"segmentationRule": "continuity"
}
# id (required)
unique ID to identify the recording task
# stream (required)
## name (required)
output stream name
## variantNames (optional)
Array of track names to record. If empty, all tracks will be
recorded. This value is Encodes.[Video|Audio|Data].Name in the
OutputProfile setting.
# schedule (optional)
<Second Minute Hour> format, same as crontab syntax
"10 */1 *" means to output the recorded file every 10 minutes of the hour
Not allowed to use with schedule
# segmentationRule (optional)
Define the policy for continuously or discontinuously timestamp
in divided recorded files.
continuity : timestamp of recorded files is continuous
discontinuity(default) : timestamp starts anew for each recorded file{
"statusCode": 200,
"message": "OK",
"response": {
"id": "2",
"state": "ready",
"vhost": "default",
"app": "app",
"stream": {
"name": "stream",
"trackIds": [],
"variantNames": []
},
"interval": 60000,
"segmentationRule": "discontinuity",
"createdTime": "2023-03-15T21:15:20.113+09:00",
}
}
# statusCode
Same as HTTP Status Code
# message
A human-readable description of the response code
# response
Created recording task information{
"message": "[HTTP] Authorization header is required to call API (401)",
"statusCode": 401
}Content-Type: application/jsonAuthorization: Basic {credentials}
# Authorization
Credentials for HTTP Basic Authentication created with <AccessToken>{
"statusCode": 200,
"message": "OK",
"response": [
"stream",
"stream2"
]
}
# statusCode
Same as HTTP Status Code
# message
A human-readable description of the response code
# response
Json array containing a list of stream namesWWW-Authenticate: Basic realm=”OvenMediaEngine”{
"message": "[HTTP] Authorization header is required to call API (401)",
"statusCode": 401
}Content-Type: application/json{
"statusCode": 404,
"message": "Could not find the application: [default/non-exists] (404)"
}{
"id": "{unique_record_id}"
}
# id (required)
unique ID to identify the recording task{
"statusCode": 200,
"message": "OK",
}
# statusCode
Same as HTTP Status Code
# message
A human-readable description of the response code{
"message": "[HTTP] Authorization header is required to call API (401)",
"statusCode": 401
}{
"id": "{unique_record_id}"
}
# id (optional)
unique ID to identify the recording task. If no id is given in the request, the full list is returned.{
"statusCode": 200,
"message": "OK",
"response": [
{
"id": "2",
"state": "recording",
"vhost": "default",
"app": "app",
"stream": {
"name": "stream",
"trackIds": [],
"variantNames": []
},
"interval": 60000,
"segmentationRule": "discontinuity",
"createdTime": "2023-03-15T21:15:20.113+09:00",
},
{
"id": "3",
...
}
]
}
# statusCode
Same as HTTP Status Code
# message
A human-readable description of the response code
# response
Information of recording tasks. If there is no recording task,
response with empty array ("response": []){
"message": "[HTTP] Authorization header is required to call API (401)",
"statusCode": 401
}Authorization: Basic {credentials}
Content-Type: application/json
# Authorization
Credentials for HTTP Basic Authentication created with <AccessToken>{
"name": "new_stream_name",
"urls": [
"rtsp://192.168.0.160:553/app/stream",
"url to pull the stream from - support OVT/RTSP",
"Only urls with the same scheme can be sent as a group."
],
"properties":{
"persistent": false,
"noInputFailoverTimeoutMs": 3000,
"unusedStreamDeletionTimeoutMs": 60000,
"ignoreRtcpSRTimestamp": false
}
}
# name (required)
Stream name to create
# urls (required)
A list of URLs to pull streams from, in Json array format.
All URLs must have the same scheme.
# properties (optional)
## persistent
Created as a persistent stream, not deleted until DELETE
## noInputFailoverTimeoutMs
If no data is input during this period, the stream is deleted,
but ignored if persistent is true
## unusedStreamDeletionTimeoutMs
If no data is output during this period (if there is no viewer),
the stream is deleted, but ignored if persistent is true
## ignoreRtcpSRTimestamp
No waits RTCP SR and start stream immediatelyContent-Type: application/json{
"message": "Created",
"statusCode": 201
}
# statusCode
Same as HTTP Status Code
# message
A human-readable description of the response codeWWW-Authenticate: Basic realm=”OvenMediaEngine”{
"message": "[HTTP] Authorization header is required to call API (401)",
"statusCode": 401
}{
"statusCode": 404,
"message": "Could not find the application: [default/non-exists] (404)"
}Authorization: Basic {credentials}
# Authorization
Credentials for HTTP Basic Authentication created with <AccessToken>Content-Type: application/json{
"statusCode": 200,
"message": "OK",
"response": {
"input": {
"createdTime": "2021-01-11T03:45:21.879+09:00",
"sourceType": "Rtmp",
"tracks": [
{
"id": 0,
"type": "Video",
"video": {
"bitrate": "2500000",
"bypass": false,
"codec": "H264",
"framerate": 30.0,
"hasBframes": false,
"keyFrameInterval": 30,
"height": 720,
"width": 1280
}
},
{
"id": 1,
"audio": {
"bitrate": "128000",
"bypass": false,
"channel": 2,
"codec": "AAC",
"samplerate": 48000
},
"type": "Audio"
}
]
},
"name": "stream",
"outputs": [
{
"name": "stream",
"tracks": [
{
"id": 0,
"type": "Video",
"video": {
"bypass": true
}
},
{
"id": 1,
"audio": {
"bypass": true
},
"type": "Audio"
},
{
"id": 2,
"audio": {
"bitrate": "128000",
"bypass": false,
"channel": 2,
"codec": "OPUS",
"samplerate": 48000
},
"type": "Audio"
}
]
}
]
}
}
# statusCode
Same as HTTP Status Code
# message
A human-readable description of the response code
# response
Details of the streamkeyFrameInterval is GOP sizeWWW-Authenticate: Basic realm=”OvenMediaEngine”{
"message": "[HTTP] Authorization header is required to call API (401)",
"statusCode": 401
}Content-Type: application/json{
"statusCode": 404,
"message": "Could not find the application or stream (404)"
}Authorization: Basic {credentials}
# Authorization
Credentials for HTTP Basic Authentication created with <AccessToken>Content-Type: application/json{
"statusCode": 200,
"message": "OK",
}
# statusCode
Same as HTTP Status Code
# message
A human-readable description of the response codeWWW-Authenticate: Basic realm=”OvenMediaEngine”{
"message": "[HTTP] Authorization header is required to call API (401)",
"statusCode": 401
}Content-Type: application/json{
"message": "[HTTP] Could not find the stream: [default/#default#app/stream] (404)",
"statusCode": 404
}We will update this document as we gather troubleshooting examples. (Written in Nov 04, 2021)
prerequisites.sh Script Failedsystemctl start ovenmediaengine failed$ cd OvenMediaEngine/misc/oven_rtc_tester
$ go run OvenRtcTester.go
-url parameter is required and must be vaild. (input : undefined)
-cint int
[Optional] PeerConnection connection interval (milliseconds) (default 100)
-life int
[Optional] Number of times to execute the test (seconds)
-n int
[Optional] Number of client (default 1)
-sint int
[Optional] Summary information output cycle (milliseconds) (default 5000)
-url string
[Required] OvenMediaEngine's webrtc streaming URL (default "undefined")
$ go run OvenRtcTester.go -url ws://192.168.0.160:13333/app/stream -n 5
client_0 connection state has changed checking
client_0 has started
client_1 connection state has changed checking
client_1 has started
client_0 connection state has changed connected
client_1 connection state has changed connected
client_1 track has started, of type 100: video/H264
client_0 track has started, of type 100: video/H264
client_1 track has started, of type 101: audio/OPUS
client_0 track has started, of type 101: audio/OPUS
client_2 connection state has changed checking
client_2 has started
client_2 connection state has changed connected
client_2 track has started, of type 100: video/H264
client_2 track has started, of type 101: audio/OPUS
client_3 connection state has changed checking
client_3 has started
client_3 connection state has changed connected
client_3 track has started, of type 100: video/H264
client_3 track has started, of type 101: audio/OPUS
client_4 connection state has changed checking
client_4 has started
client_4 connection state has changed connected
client_4 track has started, of type 100: video/H264
client_4 track has started, of type 101: audio/OPUS
<Summary>
Running time : 5s
Number of clients : 5
ICE Connection State : New(0), Checking(0) Connected(5) Completed(0) Disconnected(0) Failed(0) Closed(0)
Avg Video Delay(54.20 ms) Max Video Delay(55.00 ms) Min Video Delay(53.00 ms)
Avg Audio Delay(37.00 ms) Max Audio Delay(55.00 ms) Min Audio Delay(26.00 ms)
Avg FPS(30.15) Max FPS(30.25) Min FPS(30.00)
Avg BPS(4.1 Mbps) Max BPS(4.1 Mbps) Min BPS(4.0 Mbps)
Total Bytes(11.6 MBytes) Avg Bytes(2.3 MBytes)
Total Packets(13897) Avg Packets(2779)
Total Packet Losses(0) Avg Packet Losses(0)
<Summary>
Running time : 10s
Number of clients : 5
ICE Connection State : New(0), Checking(0) Connected(5) Completed(0) Disconnected(0) Failed(0) Closed(0)
Avg Video Delay(43.60 ms) Max Video Delay(45.00 ms) Min Video Delay(42.00 ms)
Avg Audio Delay(36.60 ms) Max Audio Delay(55.00 ms) Min Audio Delay(25.00 ms)
Avg FPS(30.04) Max FPS(30.11) Min FPS(30.00)
Avg BPS(4.0 Mbps) Max BPS(4.0 Mbps) Min BPS(4.0 Mbps)
Total Bytes(24.3 MBytes) Avg Bytes(4.9 MBytes)
Total Packets(28832) Avg Packets(5766)
Total Packet Losses(0) Avg Packet Losses(0)
<Summary>
Running time : 15s
Number of clients : 5
ICE Connection State : New(0), Checking(0) Connected(5) Completed(0) Disconnected(0) Failed(0) Closed(0)
Avg Video Delay(36.60 ms) Max Video Delay(38.00 ms) Min Video Delay(35.00 ms)
Avg Audio Delay(49.20 ms) Max Audio Delay(68.00 ms) Min Audio Delay(38.00 ms)
Avg FPS(30.07) Max FPS(30.07) Min FPS(30.07)
Avg BPS(4.0 Mbps) Max BPS(4.0 Mbps) Min BPS(4.0 Mbps)
Total Bytes(36.8 MBytes) Avg Bytes(7.4 MBytes)
Total Packets(43717) Avg Packets(8743)
Total Packet Losses(0) Avg Packet Losses(0)
^CTest stopped by user
***************************
Reports
***************************
<Summary>
Running time : 15s
Number of clients : 5
ICE Connection State : New(0), Checking(0) Connected(5) Completed(0) Disconnected(0) Failed(0) Closed(0)
Avg Video Delay(23.60 ms) Max Video Delay(25.00 ms) Min Video Delay(22.00 ms)
Avg Audio Delay(11.20 ms) Max Audio Delay(18.00 ms) Min Audio Delay(5.00 ms)
Avg FPS(30.07) Max FPS(30.07) Min FPS(30.07)
Avg BPS(4.0 Mbps) Max BPS(4.0 Mbps) Min BPS(4.0 Mbps)
Total Bytes(38.6 MBytes) Avg Bytes(7.7 MBytes)
Total Packets(45662) Avg Packets(9132)
Total Packet Losses(0) Avg Packet Losses(0)
<Details>
[client_0]
running_time(15s) connection_state(connected) total_packets(9210) packet_loss(0)
last_video_delay (22.0 ms) last_audio_delay (52.0 ms)
total_bytes(7.8 Mbytes) avg_bps(4.0 Mbps) min_bps(3.6 Mbps) max_bps(4.3 Mbps)
total_video_frames(463) avg_fps(30.07) min_fps(28.98) max_fps(31.00)
client_0 connection state has changed closed
client_0 has stopped
[client_1]
running_time(15s) connection_state(connected) total_packets(9210) packet_loss(0)
last_video_delay (22.0 ms) last_audio_delay (52.0 ms)
total_bytes(7.8 Mbytes) avg_bps(4.0 Mbps) min_bps(3.6 Mbps) max_bps(4.3 Mbps)
total_video_frames(463) avg_fps(30.07) min_fps(28.98) max_fps(31.00)
client_1 has stopped
[client_2]
running_time(15s) connection_state(connected) total_packets(9145) packet_loss(0)
last_video_delay (23.0 ms) last_audio_delay (63.0 ms)
total_bytes(7.7 Mbytes) avg_bps(4.0 Mbps) min_bps(3.6 Mbps) max_bps(4.5 Mbps)
total_video_frames(460) avg_fps(30.07) min_fps(28.97) max_fps(31.02)
client_1 connection state has changed closed
client_2 has stopped
[client_3]
running_time(15s) connection_state(connected) total_packets(9081) packet_loss(0)
last_video_delay (25.0 ms) last_audio_delay (65.0 ms)
total_bytes(7.7 Mbytes) avg_bps(4.0 Mbps) min_bps(3.6 Mbps) max_bps(4.3 Mbps)
total_video_frames(457) avg_fps(30.07) min_fps(29.00) max_fps(31.03)
client_2 connection state has changed closed
client_3 has stopped
client_3 connection state has changed closed
[client_4]
running_time(15s) connection_state(connected) total_packets(9016) packet_loss(0)
last_video_delay (26.0 ms) last_audio_delay (36.0 ms)
total_bytes(7.6 Mbytes) avg_bps(4.0 Mbps) min_bps(3.6 Mbps) max_bps(4.3 Mbps)
total_video_frames(454) avg_fps(30.07) min_fps(28.99) max_fps(31.02)
client_4 has stopped$ go run OvenRtcTester.go -url ws://192.168.0.160:13333/app/stream -n 100
client_0 connection state has changed checking
client_0 has started
client_0 connection state has changed connected
client_0 track has started, of type 100: video/H264
client_0 track has started, of type 101: audio/OPUS
client_1 connection state has changed checking
client_1 has started
client_1 connection state has changed connected
client_1 track has started, of type 100: video/H264
client_1 track has started, of type 101: audio/OPUS
client_2 connection state has changed checking
client_2 has started
client_2 connection state has changed connected
client_2 track has started, of type 100: video/H264
client_2 track has started, of type 101: audio/OPUS
....
client_94 connection state has changed checking
client_94 has started
client_94 connection state has changed connected
client_94 track has started, of type 100: video/H264
client_94 track has started, of type 101: audio/OPUS
client_95 connection state has changed checking
client_95 has started
client_95 connection state has changed connected
client_95 track has started, of type 100: video/H264
client_95 track has started, of type 101: audio/OPUS
client_96 connection state has changed checking
client_96 has started
<Summary>
Running time : 10s
Number of clients : 97
ICE Connection State : New(0), Checking(1) Connected(96) Completed(0) Disconnected(0) Failed(0) Closed(0)
Avg Video Delay(13.51 ms) Max Video Delay(47.00 ms) Min Video Delay(0.00 ms)
Avg Audio Delay(22.42 ms) Max Audio Delay(67.00 ms) Min Audio Delay(0.00 ms)
Avg FPS(27.20) Max FPS(32.51) Min FPS(0.00)
Avg BPS(3.7 Mbps) Max BPS(4.6 Mbps) Min BPS(0bps)
Total Bytes(238.7 MBytes) Avg Bytes(2.5 MBytes)
Total Packets(285013) Avg Packets(2938)
Total Packet Losses(306) Avg Packet Losses(3)
<Bind>
<Providers>
<RTMP>
<Port>1935</Port>
<WorkerCount>1</WorkerCount>
</RTMP>
...
</Providers>
...
<Publishers>
<WebRTC>
<Signalling>
<Port>3333</Port>
<WorkerCount>1</WorkerCount>
</Signalling>
<IceCandidates>
<TcpRelay>*:3478</TcpRelay>
<IceCandidate>*:10000/udp</IceCandidate>
<TcpRelayWorkerCount>1</TcpRelayWorkerCount>
</IceCandidates>
...
</Bind>
<Application>
<Publishers>
<AppWorkerCount>1</AppWorkerCount>
<StreamWorkerCount>8</StreamWorkerCount>
</Publishers>
</Application><Publishers>
<AppWorkerCount>32</AppWorkerCount>
<StreamWorkerCount>0</StreamWorkerCount>
</Publishers><Publishers>
<AppWorkerCount>1</AppWorkerCount>
<StreamWorkerCount>32</StreamWorkerCount>
</Publishers>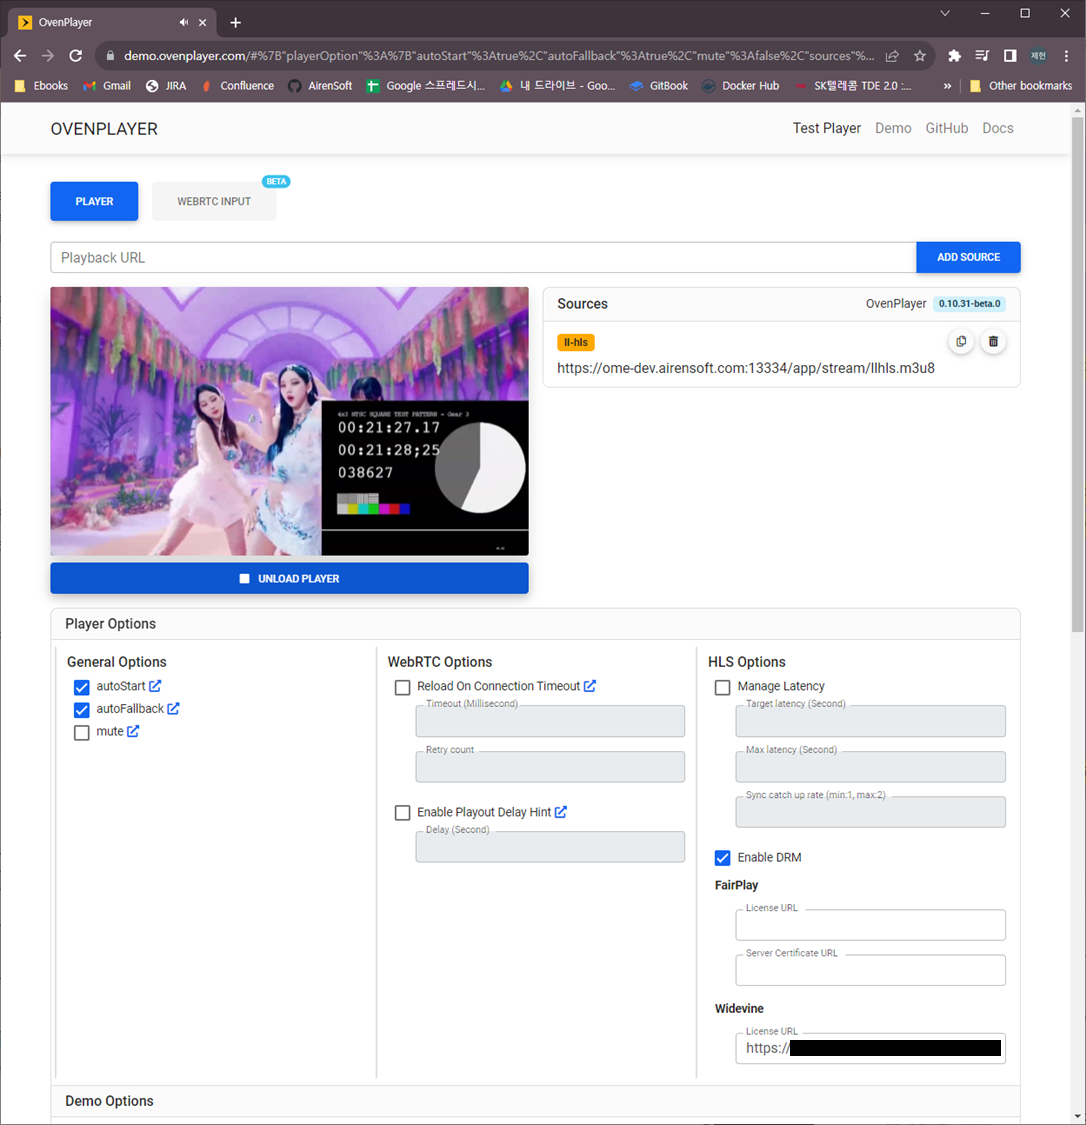
sudo apt install -y build-essential nasm autoconf libtool zlib1g-dev tclsh cmake curlsudo yum install -y gcc-c++ make nasm autoconf libtool zlib-devel tcl cmakesudo dnf install -y bc gcc-c++ autoconf libtool tcl bzip2 zlib-devel cmake libuuid-devel
sudo dnf install -y perl-IPC-Cmd perl-FindBin
Request
Responses
<Bind>
<Publishers>
<WebRTC>
<Signalling>
<Port>3333</Port>
<TLSPort>3334</TLSPort>
<WorkerCount>1</WorkerCount>
</Signalling>
<IceCandidates>
<IceCandidate>*:10000-10005/udp</IceCandidate>
<TcpRelay>*:3478</TcpRelay>
<TcpForce>true</TcpForce>
<TcpRelayWorkerCount>1</TcpRelayWorkerCount>
</IceCandidates>
</WebRTC>
</Publishers>
</Bind><Server version="7">
<VirtualHosts>
<VirtualHost>
<Applications>
<Application>
<Publishers>
<WebRTC>
<Timeout>30000</Timeout>
<Rtx>false</Rtx>
<Ulpfec>false</Ulpfec>
<JitterBuffer>false</JitterBuffer>
</WebRTC>
</Publishers>
</Application>
</Applications>
</VirtualHost>
</VirtualHosts>
</Server><OutputProfiles>
<OutputProfile>
<Name>bypass_stream</Name>
<OutputStreamName>${OriginStreamName}</OutputStreamName>
<Encodes>
<Audio>
<Bypass>true</Bypass>
</Audio>
<Video>
<Bypass>true</Bypass>
</Video>
<Video>
<!-- vp8, h264 -->
<Codec>vp8</Codec>
<Width>1280</Width>
<Height>720</Height>
<Bitrate>2000000</Bitrate>
<Framerate>30.0</Framerate>
</Video>
<Audio>
<Codec>opus</Codec>
<Bitrate>128000</Bitrate>
<Samplerate>48000</Samplerate>
<Channel>2</Channel>
</Audio>
</Encodes>
</OutputProfile>
</OutputProfiles><OutputProfiles>
<OutputProfile>
<Name>default</Name>
<OutputStreamName>${OriginStreamName}</OutputStreamName>
<Playlist>
<Name>for Webrtc</Name>
<FileName>abr</FileName>
<Options>
<WebRtcAutoAbr>false</WebRtcAutoAbr>
</Options>
<Rendition>
<Name>1080p</Name>
<Video>1080p</Video>
<Audio>opus</Audio>
</Rendition>
<Rendition>
<Name>480p</Name>
<Video>480p</Video>
<Audio>opus</Audio>
</Rendition>
<Rendition>
<Name>720p</Name>
<Video>720p</Video>
<Audio>opus</Audio>
</Rendition>
</Playlist>
<Playlist>
<Name>for llhls</Name>
<FileName>llhls_abr</FileName>
<Rendition>
<Name>480p</Name>
<Video>480p</Video>
<Audio>bypass_audio</Audio>
</Rendition>
<Rendition>
<Name>720p</Name>
<Video>720p</Video>
<Audio>bypass_audio</Audio>
</Rendition>
</Playlist>
<Encodes>
<Video>
<Name>bypass_video</Name>
<Bypass>true</Bypass>
</Video>
<Video>
<Name>480p</Name>
<Codec>h264</Codec>
<Width>640</Width>
<Height>480</Height>
<Bitrate>500000</Bitrate>
<Framerate>30</Framerate>
</Video>
<Video>
<Name>720p</Name>
<Codec>h264</Codec>
<Width>1280</Width>
<Height>720</Height>
<Bitrate>2000000</Bitrate>
<Framerate>30</Framerate>
</Video>
<Video>
<Name>1080p</Name>
<Codec>h264</Codec>
<Width>1920</Width>
<Height>1080</Height>
<Bitrate>5000000</Bitrate>
<Framerate>30</Framerate>
</Video>
<Audio>
<Name>bypass_audio</Name>
<Bypass>True</Bypass>
</Audio>
<Audio>
<Name>opus</Name>
<Codec>opus</Codec>
<Bitrate>128000</Bitrate>
<Samplerate>48000</Samplerate>
<Channel>2</Channel>
</Audio>
</Encodes>
</OutputProfile>
</OutputProfiles><Playlist>
<Name>for Webrtc</Name>
<FileName>abr</FileName>
<Options>
<WebRtcAutoAbr>false</WebRtcAutoAbr>
</Options>
<Rendition>
<Name>1080p</Name>
<Video>1080p</Video>
<Audio>opus</Audio>
</Rendition>
<Rendition>
<Name>480p</Name>
<Video>480p</Video>
<Audio>opus</Audio>
</Rendition>
<Rendition>
<Name>720p</Name>
<Video>720p</Video>
<Audio>opus</Audio>
</Rendition>
<Rendition>
<Name>1080pVp8</Name>
<Video>1080pVp8</Video>
<Audio>opus</Audio>
</Rendition>
<Rendition>
<Name>480pVp8</Name>
<Video>480pVp8</Video>
<Audio>opus</Audio>
</Rendition>
<Rendition>
<Name>720pVp8</Name>
<Video>720pVp8</Video>
<Audio>opus</Audio>
</Rendition>
</Playlist><Server version="8">
...
<StunServer>stun.l.google.com:19302</StunServer>
<Bind>
<Publishers>
<WebRTC>
...
<IceCandidates>
<!-- <TcpRelay>*:3478</TcpRelay> -->
<TcpRelay>Relay IP:Port</TcpRelay>
<TcpForce>false</TcpForce>
<IceCandidate>*:10000-10005/udp</IceCandidate>
</IceCandidates>
</WebRTC>
</Publishers>
</Bind>
...
</Server> ws(s)://host:port/app/stream?transport=tcpmyPeerConnection = new RTCPeerConnection({
iceServers: [
{
urls: "turn:Relay IP:Port?transport=tcp",
username: "ome",
credential: "airen"
}
]
});candidates: [{candidate: "candidate:0 1 UDP 50 192.168.0.200 10006 typ host", sdpMLineIndex: 0}]
code: 200
command: "offer"
ice_servers: [{credential: "airen", urls: ["turn:192.168.0.200:3478?transport=tcp"], user_name: "ome"}]
id: 506764844
peer_id: 0
sdp: {,…}PREFIX=/opt/ovenmediaengine && \
OPENSSL_VERSION=1.1.0g && \
DIR=/tmp/openssl && \
mkdir -p ${DIR} && \
cd ${DIR} && \
curl -sLf https://www.openssl.org/source/openssl-${OPENSSL_VERSION}.tar.gz | tar -xz --strip-components=1 && \
./config --prefix="${PREFIX}" --openssldir="${PREFIX}" -Wl,-rpath="${PREFIX}/lib" shared no-idea no-mdc2 no-rc5 no-ec2m no-ecdh no-ecdsa no-async && \
make -j 4 && \
sudo make install_sw && \
rm -rf ${DIR} && \
sudo rm -rf ${PREFIX}/binPREFIX=/opt/ovenmediaengine && \
SRTP_VERSION=2.2.0 && \
DIR=/tmp/srtp && \
mkdir -p ${DIR} && \
cd ${DIR} && \
curl -sLf https://github.com/cisco/libsrtp/archive/v${SRTP_VERSION}.tar.gz | tar -xz --strip-components=1 && \
./configure --prefix="${PREFIX}" --enable-shared --disable-static --enable-openssl --with-openssl-dir="${PREFIX}" && \
make shared_library -j 4 && \
sudo make install && \
rm -rf ${DIR}PREFIX=/opt/ovenmediaengine && \
SRT_VERSION=1.3.3 && \
DIR=/tmp/srt && \
mkdir -p ${DIR} && \
cd ${DIR} && \
curl -sLf https://github.com/Haivision/srt/archive/v${SRT_VERSION}.tar.gz | tar -xz --strip-components=1 && \
PKG_CONFIG_PATH=${PREFIX}/lib/pkgconfig:${PKG_CONFIG_PATH} ./configure --prefix="${PREFIX}" --enable-shared --disable-static && \
make -j 4 && \
sudo make install && \
rm -rf ${DIR} && \
sudo rm -rf ${PREFIX}/binPREFIX=/opt/ovenmediaengine && \
OPUS_VERSION=1.1.3 && \
DIR=/tmp/opus && \
mkdir -p ${DIR} && \
cd ${DIR} && \
curl -sLf https://archive.mozilla.org/pub/opus/opus-${OPUS_VERSION}.tar.gz | tar -xz --strip-components=1 && \
autoreconf -fiv && \
./configure --prefix="${PREFIX}" --enable-shared --disable-static && \
make -j 4&& \
sudo make install && \
sudo rm -rf ${PREFIX}/share && \
rm -rf ${DIR}PREFIX=/opt/ovenmediaengine && \
X264_VERSION=20190513-2245-stable && \
DIR=/tmp/x264 && \
mkdir -p ${DIR} && \
cd ${DIR} && \
curl -sLf https://download.videolan.org/pub/videolan/x264/snapshots/x264-snapshot-${X264_VERSION}.tar.bz2 | tar -jx --strip-components=1 && \
./configure --prefix="${PREFIX}" --enable-shared --enable-pic --disable-cli && \
make -j 4&& \
sudo make install && \
rm -rf ${DIR}PREFIX=/opt/ovenmediaengine && \
VPX_VERSION=1.7.0 && \
DIR=/tmp/vpx && \
mkdir -p ${DIR} && \
cd ${DIR} && \
curl -sLf https://codeload.github.com/webmproject/libvpx/tar.gz/v${VPX_VERSION} | tar -xz --strip-components=1 && \
./configure --prefix="${PREFIX}" --enable-vp8 --enable-pic --enable-shared --disable-static --disable-vp9 --disable-debug --disable-examples --disable-docs --disable-install-bins && \
make -j 4 && \
sudo make install && \
rm -rf ${DIR}PREFIX=/opt/ovenmediaengine && \
FDKAAC_VERSION=0.1.5 && \
DIR=/tmp/aac && \
mkdir -p ${DIR} && \
cd ${DIR} && \
curl -sLf https://github.com/mstorsjo/fdk-aac/archive/v${FDKAAC_VERSION}.tar.gz | tar -xz --strip-components=1 && \
autoreconf -fiv && \
./configure --prefix="${PREFIX}" --enable-shared --disable-static --datadir=/tmp/aac && \
make -j 4&& \
sudo make install && \
rm -rf ${DIR}PREFIX=/opt/ovenmediaengine && \
FFMPEG_VERSION=3.4 && \
DIR=/tmp/ffmpeg && \
mkdir -p ${DIR} && \
cd ${DIR} && \
curl -sLf https://github.com/AirenSoft/FFmpeg/archive/ome/${FFMPEG_VERSION}.tar.gz | tar -xz --strip-components=1 && \
PKG_CONFIG_PATH=${PREFIX}/lib/pkgconfig:${PKG_CONFIG_PATH} ./configure \
--prefix="${PREFIX}" \
--enable-gpl \
--enable-nonfree \
--extra-cflags="-I${PREFIX}/include" \
--extra-ldflags="-L${PREFIX}/lib -Wl,-rpath,${PREFIX}/lib" \
--extra-libs=-ldl \
--enable-shared \
--disable-static \
--disable-debug \
--disable-doc \
--disable-programs \
--disable-avdevice --disable-dct --disable-dwt --disable-error-resilience --disable-lsp --disable-lzo --disable-rdft --disable-faan --disable-pixelutils \
--disable-everything \
--enable-zlib --enable-libopus --enable-libvpx --enable-libfdk_aac --enable-libx264 \
--enable-encoder=libvpx_vp8,libvpx_vp9,libopus,libfdk_aac,libx264 \
--enable-decoder=aac,aac_latm,aac_fixed,h264 \
--enable-parser=aac,aac_latm,aac_fixed,h264 \
--enable-network --enable-protocol=tcp --enable-protocol=udp --enable-protocol=rtp --enable-demuxer=rtsp \
--enable-filter=asetnsamples,aresample,aformat,channelmap,channelsplit,scale,transpose,fps,settb,asettb && \
make && \
sudo make install && \
sudo rm -rf ${PREFIX}/share && \
rm -rf ${DIR}PREFIX=/opt/ovenmediaengine && \
JEMALLOC_VERSION=5.2.1 && \
DIR=${TEMP_PATH}/jemalloc && \
mkdir -p ${DIR} && \
cd ${DIR} && \
curl -sLf https://github.com/jemalloc/jemalloc/releases/download/${JEMALLOC_VERSION}/jemalloc-${JEMALLOC_VERSION}.tar.bz2 | tar -jx --strip-components=1 && \
./configure --prefix="${PREFIX}" && \
make && \
sudo make install_include install_lib && \
rm -rf ${DIR}# Example of SELinux disallow OvenMediaEngine execution
$ systemctl start ovenmediaengine
==== AUTHENTICATING FOR org.freedesktop.systemd1.manage-units ====
Authentication is required to start 'ovenmediaengine.service'.
Authenticating as: Jeheon Han (getroot)
Password:
==== AUTHENTICATION COMPLETE ====
Failed to start ovenmediaengine.service: Unit ovenmediaengine. service not found.
# Check if SELinux is enabled
$ sestatus
SELinux status: enabled
SELinuxfs mount: /sys/fs/selinux
SELinux root directory: /etc/selinux
Loaded policy name: targeted
Current mode: enforcing
Mode from config file: enforcing
Policy MLS status: enabled
Policy deny_unknown status: allowed
Memory protection checking: actual (secure)
Max kernel policy version: 31
# Check if SELinux denies execution
$ sudo tail /var/log/messages
...
May 17 12:44:24 localhost audit[1]: AVC avc: denied { read } for pid=1 comm="systemd" name="ovenmediaengine.service" dev="dm-0" ino=16836708 scontext=system_u:system_r:init_t:s0 tcontext=system_u:object_r:default_t:s0 tclass=file permissive=0
May 17 12:44:24 localhost audit[1]: AVC avc: denied { read } for pid=1 comm="systemd" name="ovenmediaengine.service" dev="dm-0" ino=16836708 scontext=system_u:system_r:init_t:s0 tcontext=system_u:object_r:default_t:s0 tclass=file permissive=0$ cd <OvenMediaEngine Git Clone Root Path>
$ sudo semodule -i misc/ovenmediaengine.pp
$ sudo touch /.autorelabel
# If you add a policy to SELinux, you must reboot the system.
$ sudo reboot$ sudo setenforce 0[ec2-user@ip-172-31-56-213 ~]$ cat /etc/sysctl.conf
fs.file-max = 100000
net.core.somaxconn = 65535
net.ipv4.tcp_max_tw_buckets = 1440000
net.ipv4.ip_local_port_range = 1024 65000
net.ipv4.tcp_fin_timeout = 15
net.ipv4.tcp_window_scaling = 1
net.ipv4.tcp_max_syn_backlog = 324000
net.core.rmem_max = 16777216
net.core.wmem_max = 16777216
net.core.rmem_default = 16777216
net.core.wmem_default = 16777216
net.core.optmem_max = 40960
net.ipv4.tcp_rmem = 4096 87380 16777216
net.ipv4.tcp_wmem = 4096 65536 16777216
net.core.netdev_max_backlog = 50000
net.ipv4.tcp_max_tw_buckets = 2000000
net.ipv4.tcp_tw_reuse = 1
net.ipv4.tcp_fin_timeout = 10
net.ipv4.tcp_slow_start_after_idle = 0
[ec2-user@ip-172-31-56-213 ~]$ cat /etc/security/limits.conf
* soft nofile 1048576
* hard nofile 1048576[ec2-user@ip-172-31-56-213 ~]$ cat /etc/security/limits.conf
* soft nofile 1048576
* hard nofile 1048576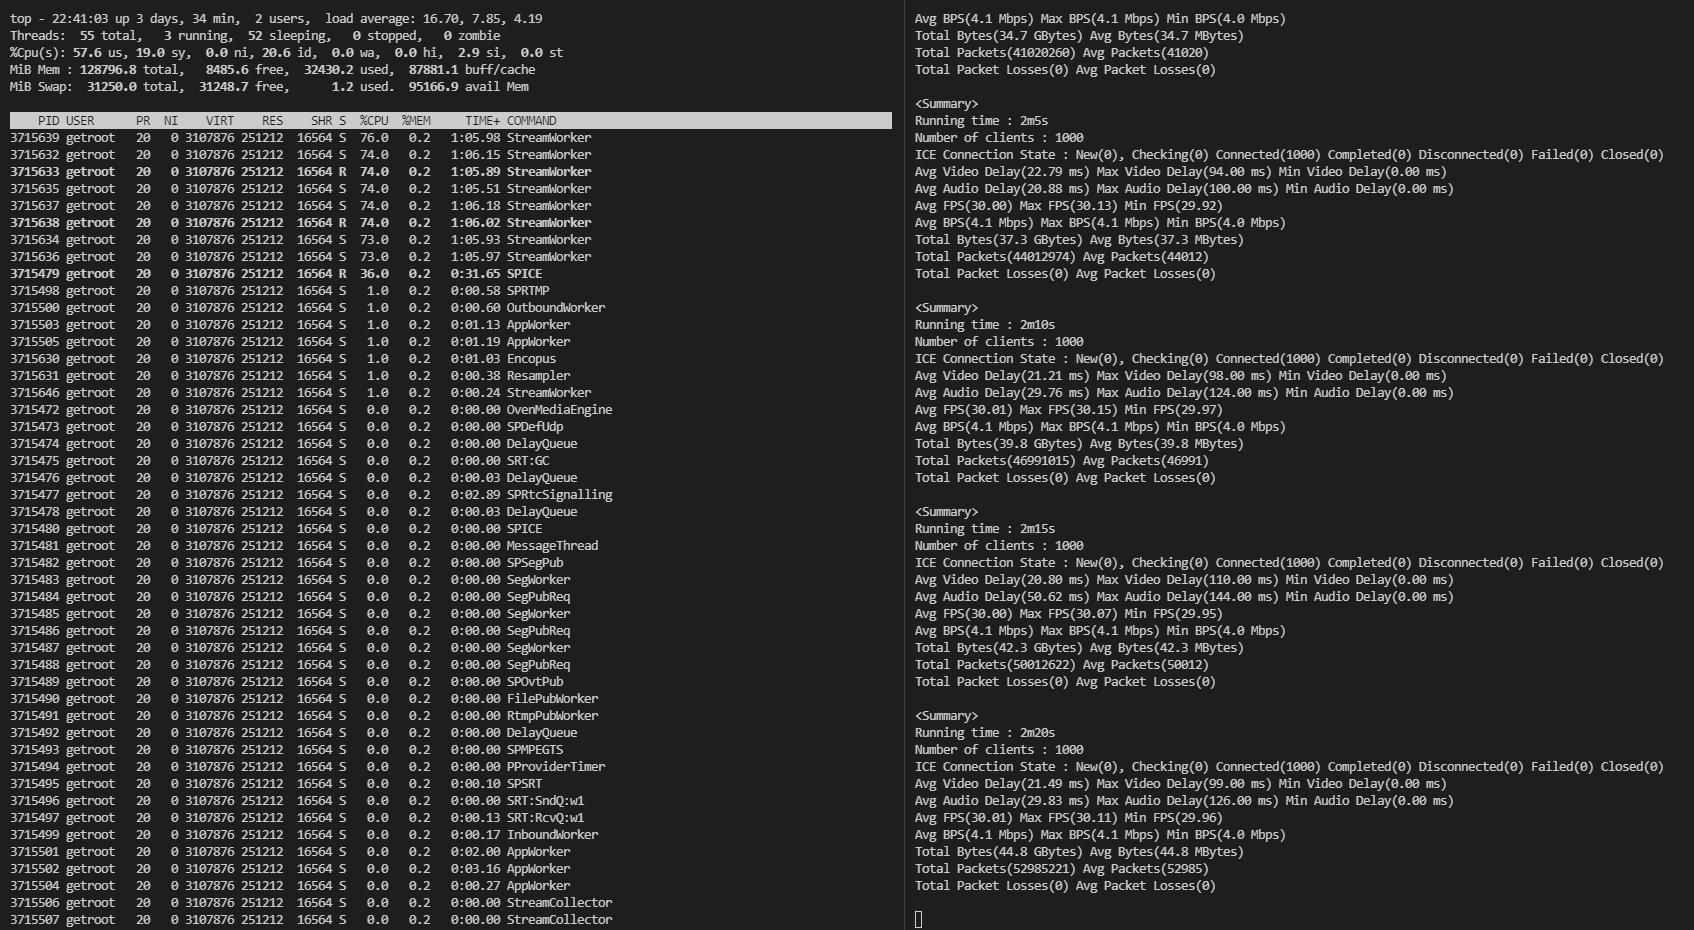
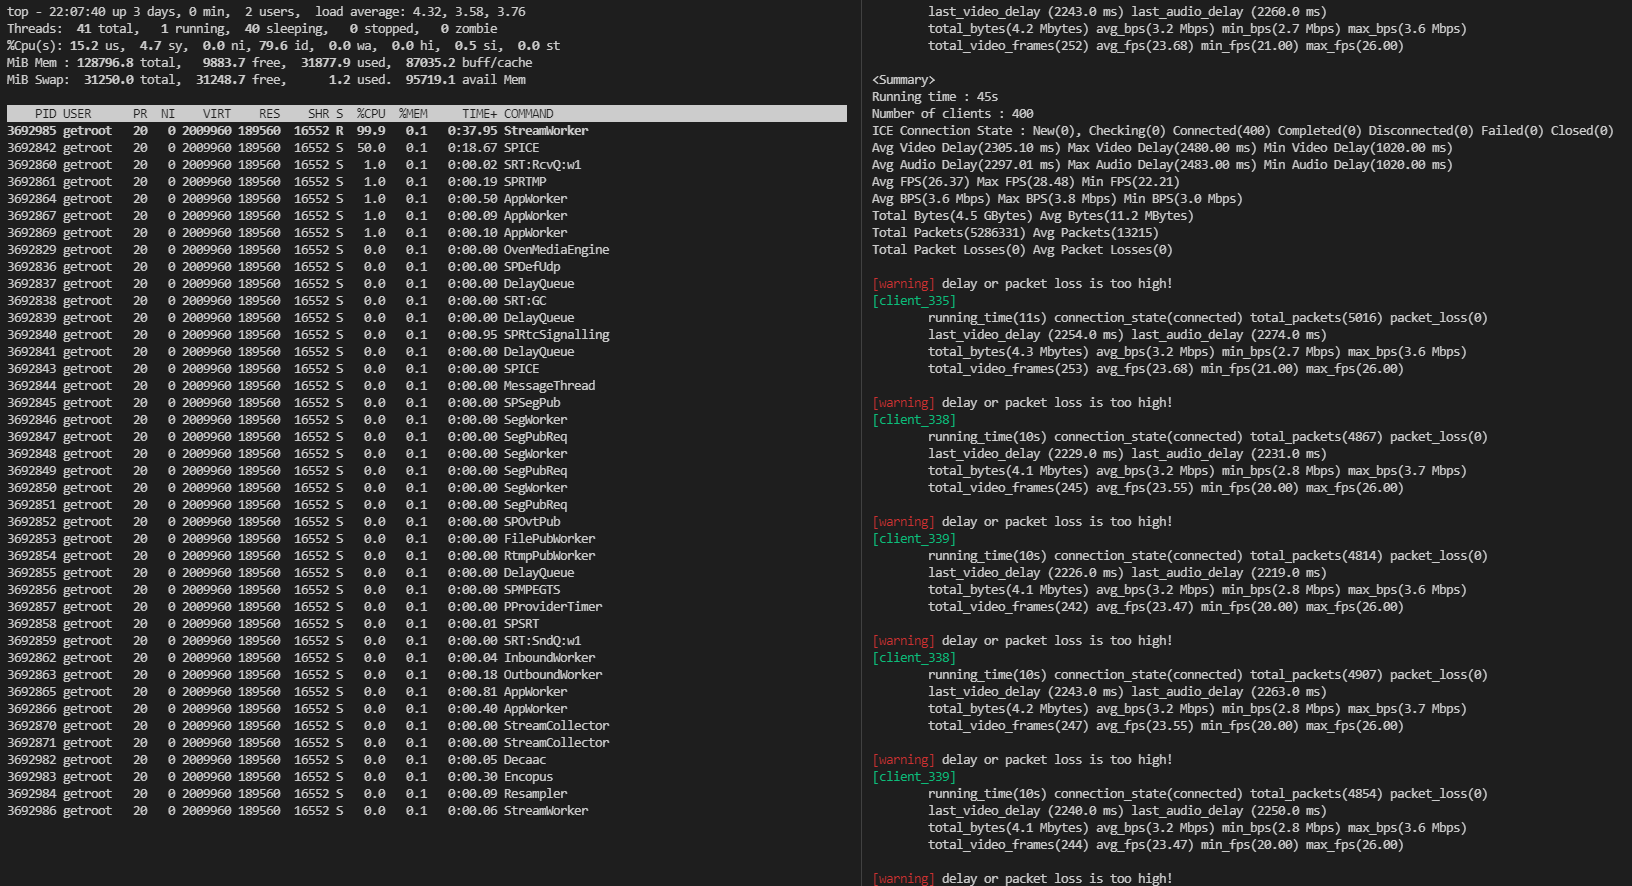
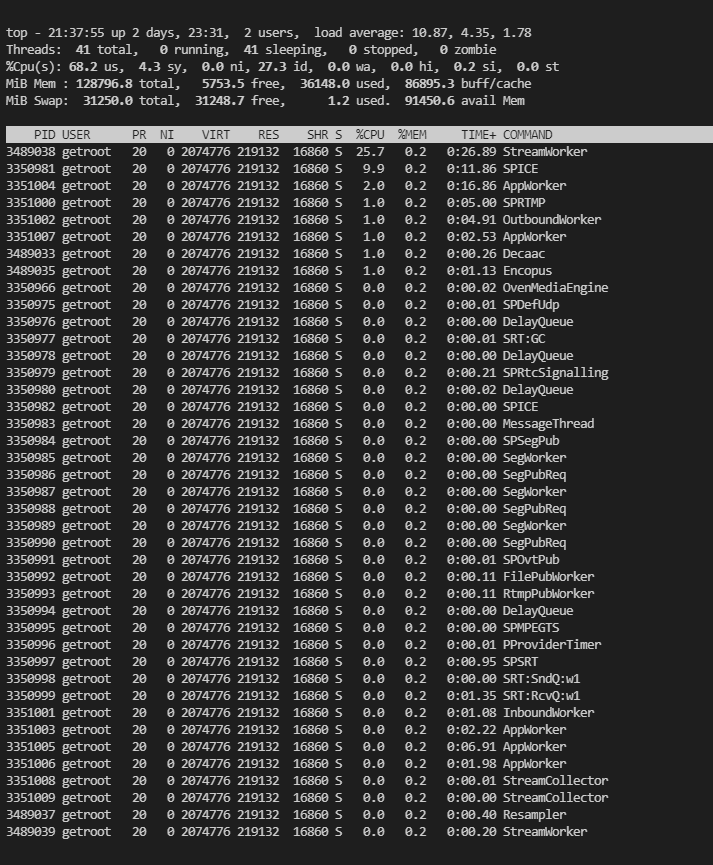
Content-Type: application/jsonAuthorization: Basic {credentials}
# Authorization
Credentials for HTTP Basic Authentication created with <AccessToken>{
"message": "OK",
"response": [
"stream"
],
"statusCode": 200
}
# statusCode
Same as HTTP Status Code
# message
A human-readable description of the response code
# response
Json array containing a list of stream namesWWW-Authenticate: Basic realm=”OvenMediaEngine”{
"message": "[HTTP] Authorization header is required to call API (401)",
"statusCode": 401
}Content-Type: application/json{
"statusCode": 404,
"message": "Could not find the application: [default/non-exists] (404)"
}Authorization: Basic {credentials}
Content-Type: application/json
# Authorization
Credentials for HTTP Basic Authentication created with <AccessToken>{
"stream": {
"name": "stream2",
"bypassTranscoder": false,
"videoTrack": true,
"audioTrack": true
},
"fallbackProgram": {
"items": [
{
"url": "file://video/sample.mp4",
"start": 0,
"duration": 60000
}
]
},
"programs": [
{
"name": "1",
"scheduled": "2023-11-13T20:57:00.000+09",
"repeat": true,
"items": [
{
"url": "file://video/sample.mp4",
"start": 0,
"duration": 60000
},
{
"url": "file://video/1.mp4",
"start": 0,
"duration": 60000
}
]
},
{
"name": "2",
"scheduled": "2023-11-14T20:57:00.000+09",
"repeat": true,
"items": [
{
"url": "file://1.mp4",
"start": 0,
"duration": 60000
},
{
"url": "file://sample.mp4",
"start": 0,
"duration": 60000
}
]
}
]
}Content-Type: application/json{
"message": "Created",
"statusCode": 201
}
# statusCode
Same as HTTP Status Code
# message
A human-readable description of the response codeWWW-Authenticate: Basic realm=”OvenMediaEngine”{
"message": "[HTTP] Authorization header is required to call API (401)",
"statusCode": 401
}{
"statusCode": 404,
"message": "Could not find the application: [default/non-exists] (404)"
}Authorization: Basic {credentials}
# Authorization
Credentials for HTTP Basic Authentication created with <AccessToken>Content-Type: application/json{
"message": "[HTTP] Cannot change [name] using this API (400)",
"statusCode": 400
}WWW-Authenticate: Basic realm=”OvenMediaEngine”{
"message": "[HTTP] Could not find the application: [default/app2] (404)",
"statusCode": 404
}Authorization: Basic {credentials}
# Authorization
Credentials for HTTP Basic Authentication created with <AccessToken>Content-Type: application/json{
"message": "OK",
"response": {
"currentProgram": {
"currentItem": {
"currentPosition": 1700,
"duration": 60000,
"start": 0,
"url": "file://video/1.mp4"
},
"duration": -1,
"end": "2262-04-12T08:47:16.854+09:00",
"name": "2",
"repeat": true,
"scheduled": "2023-11-20T20:57:00.000+09:00",
"state": "onair"
},
"fallbackProgram": {
"items": [
{
"duration": -1,
"start": 0,
"url": "file://hevc.mov"
},
{
"duration": -1,
"start": 0,
"url": "file://avc.mov"
}
],
"name": "fallback",
"repeat": true,
"scheduled": "1970-01-01T00:00:00Z"
},
"programs": [
{
"name": "2",
"repeat": true,
"scheduled": "2023-11-20T20:57:00.000+09"
}
],
"stream": {
"audioTrack": true,
"bypassTranscoder": false,
"name": "stream",
"videoTrack": true
}
},
"statusCode": 200
}WWW-Authenticate: Basic realm=”OvenMediaEngine”{
"message": "[HTTP] Authorization header is required to call API (401)",
"statusCode": 401
}Content-Type: application/json{
"statusCode": 404,
"message": "Could not find the application or stream (404)"
}Authorization: Basic {credentials}
# Authorization
Credentials for HTTP Basic Authentication created with <AccessToken>Content-Type: application/json{
"statusCode": 200,
"message": "OK",
}
# statusCode
Same as HTTP Status Code
# message
A human-readable description of the response codeWWW-Authenticate: Basic realm=”OvenMediaEngine”{
"message": "[HTTP] Authorization header is required to call API (401)",
"statusCode": 401
}Content-Type: application/json{
"message": "[HTTP] Could not find the stream: [default/#default#app/stream] (404)",
"statusCode": 404
}{
"fallbackProgram": {
"items": [
{
"url": "file://video/sample.mp4",
"start": 5000,
"duration": 30000
}
]
},
"programs": [
{
"name": "1",
"scheduled": "2023-11-10T20:57:00.000+09",
"repeat": true,
"items": [
{
"url": "file://video/1.mp4",
"start": 0,
"duration": 60000
}
]
},
{
"name": "2",
"scheduled": "2023-11-20T20:57:00.000+09",
"repeat": true,
"items": [
{
"url": "file://video/1.mp4",
"start": 0,
"duration": 60000
},
{
"url": "file://video/sample.mp4",
"start": 0,
"duration": 60000
}
]
}
]
}{
"message": "Created",
"statusCode": 201
}{
"message": "[HTTP] Authorization header is required to call API (401)",
"statusCode": 401
}Authorization: Basic {credentials}
# Authorization
Credentials for HTTP Basic Authentication created with <AccessToken>Content-Type: application/jsonContent-Type: application/jsonWWW-Authenticate: Basic realm=”OvenMediaEngine”Authorization: Basic {credentials}
# Authorization
Credentials for HTTP Basic Authentication created with <AccessToken>Content-Type: application/jsonWWW-Authenticate: Basic realm=”OvenMediaEngine”{
"message": "[HTTP] Could not find the virtual host: [default1] (404)",
"statusCode": 404
}Authorization: Basic {credentials}
# Authorization
Credentials for HTTP Basic Authentication created with <AccessToken>Content-Type: application/jsonWWW-Authenticate: Basic realm=”OvenMediaEngine”{
"message": "[HTTP] Could not find the virtual host: [default1] (404)",
"statusCode": 404
}{
"message": "[HTTP] Internal Server Error (500)",
"statusCode": 500
}

{
"statusCode": 200,
"message": "OK",
"response": [
"default",
"service",
"poc"
]
}
# statusCode
Same as HTTP Status Code
# message
A human-readable description of the response code
# response
Json array containing a list of virtual host names{
"message": "[HTTP] Authorization header is required to call API (401)",
"statusCode": 401
}[
{
"name": "vhost",
"host": {
"names": [
"ome-dev.airensoft.com",
"prod.airensoft.com"
],
"tls": {
"certPath": "/etc/pki/airensoft.com/_airensoft_com.crt",
"chainCertPath": "/etc/pki/airensoft.com/_airensoft_com.ca-bundle",
"keyPath": "/etc/pki/airensoft.com/_airensoft_com.key"
}
},
"signedPolicy": {
"enables": {
"providers": "rtmp,webrtc,srt",
"publishers": "webrtc,llhls"
},
"policyQueryKeyName": "policy",
"secretKey": "aKq#1kj",
"signatureQueryKeyName": "signature"
},
"admissionWebhooks": {
"controlServerUrl": "https://control.server/admission",
"enables": {
"providers": "rtmp,webrtc,srt",
"publishers": "webrtc,llhls"
},
"secretKey": "",
"timeout": 3000
},
"origins": {
"origin": [
{
"location": "/app/rtsp",
"pass": {
"scheme": "rtsp",
"urls": {
"url": [
"rtsp.server:8554/ca-01"
]
}
}
}
]
},
"originMapStore": {
"originHostName": "ome-dev.airensoft.com",
"redisServer": {
"auth": "!@#ovenmediaengine",
"host": "redis.server:6379"
}
}
},
{
"name": "vhost2",
"host": {
"names": [
"ovenmediaengine.com"
],
"tls": {
"certPath": "/etc/pki/ovenmediaengine.com/_ovenmediaengine_com.crt",
"chainCertPath": "/etc/pki/ovenmediaengine.com/_ovenmediaengine_com.ca-bundle",
"keyPath": "/etc/pki/ovenmediaengine.com/_ovenmediaengine_com.key"
}
}
}
]
# name (required)
The virtual host name. Cannot be duplicated.
# host (required)
## names (required)
The addresses(IP or Domain)of the host.
## tls (optional)
The certificate file path. Required if using TLS.
# signedPolicy (optional)
The SignedPolicy setting. Please refer to the manual for details.
# admissionWebhooks (optional)
The AdmissionWebhooks setting. Please refer to the manual for details.
# origins (optional)
The Origins setting. Please refer to the manual for details.
# originMapStore (optional)
The OriginMapStore setting. Please refer to the manual for details.[
{
"message": "OK",
"statusCode": 200,
"response": {
"name": "enterprise",
"host": {
"names": [
"ome-dev.airensoft.com",
"prod.airensoft.com"
],
"tls": {
"certPath": "/etc/pki/airensoft.com/_airensoft_com.crt",
"chainCertPath": "/etc/pki/airensoft.com/_airensoft_com.ca-bundle",
"keyPath": "/etc/pki/airensoft.com/_airensoft_com.key"
}
},
"signedPolicy": {
"enables": {
"providers": "rtmp,webrtc,srt",
"publishers": "webrtc,llhls"
},
"policyQueryKeyName": "policy",
"secretKey": "aKq#1kj",
"signatureQueryKeyName": "signature"
},
"admissionWebhooks": {
"controlServerUrl": "https://control.server/admission",
"enables": {
"providers": "rtmp,webrtc,srt",
"publishers": "webrtc,llhls"
},
"secretKey": "",
"timeout": 3000
},
"origins": {
"origin": [
{
"location": "/app/rtsp",
"pass": {
"scheme": "rtsp",
"urls": {
"url": [
"rtsp.server:8554/ca-01"
]
}
}
}
]
},
"originMapStore": {
"originHostName": "ome-dev.airensoft.com",
"redisServer": {
"auth": "!@#ovenmediaengine",
"host": "redis.server:6379"
}
}
}
},
{
"message": "OK",
"statusCode": 200,
"response": {
"name": "free",
"host": {
"names": [
"ovenmediaengine.com"
],
"tls": {
"certPath": "/etc/pki/ovenmediaengine.com/_ovenmediaengine_com.crt",
"chainCertPath": "/etc/pki/ovenmediaengine.com/_ovenmediaengine_com.ca-bundle",
"keyPath": "/etc/pki/ovenmediaengine.com/_ovenmediaengine_com.key"
}
}
}
}
]
# statusCode
Same as HTTP Status Code
# message
A human-readable description of the response code
# response
Created virtual host information[
{
"statusCode": 200,
"message": "OK",
"response": {
"name": "enterprise",
"host": {
"names": [
...
},
{
"statusCode": 409,
"message": "Conflict",
"response": {
...
}
}
}
# statusCode
Same as HTTP Status Code
# message
A human-readable description of the response code
# response
Virtual host information created when statusCode is 200{
"message": "[HTTP] Authorization header is required to call API (401)",
"statusCode": 401
}
"message": "OK",
"statusCode": 200
"response": {
"name": "default",
"distribution": "ovenServer",
"host": {
"name": "default",
"distribution": "ovenServer",
"host": {
"names": [
"ome-dev.airensoft.com",
"*"
],
"tls": {
"certPath": "/etc/pki/airensoft.com/_airensoft_com.crt",
"chainCertPath": "/etc/pki/airensoft.com/_airensoft_com.ca-bundle",
"keyPath": "/etc/pki/airensoft.com/_airensoft_com.key"
}
},
"signedPolicy": {
"enables": {
"providers": "rtmp,webrtc,srt",
"publishers": "webrtc,llhls"
},
"policyQueryKeyName": "policy",
"secretKey": "aKq#1kj",
"signatureQueryKeyName": "signature"
},
"admissionWebhooks": {
"controlServerUrl": "https://control.server/admission",
"enables": {
"providers": "rtmp,webrtc,srt",
"publishers": "webrtc,llhls"
},
"secretKey": "",
"timeout": 3000
},
"origins": {
"origin": [
{
"location": "/app/rtsp",
"pass": {
"scheme": "rtsp",
"urls": {
"url": [
"rtsp.server:8554/ca-01"
]
}
}
}
]
},
"originMapStore": {
"originHostName": "ome-dev.airensoft.com",
"redisServer": {
"auth": "!@#ovenmediaengine",
"host": "redis.server:6379"
}
}
}
# statusCode
Same as HTTP Status Code
# message
A human-readable description of the response code
# response
Virtual host information{
"message": "[HTTP] Authorization header is required to call API (401)",
"statusCode": 401
}{
"message": "OK",
"statusCode": 200
}
# statusCode
Same as HTTP Status Code
# message
A human-readable description of the response code{
"message": "[HTTP] Authorization header is required to call API (401)",
"statusCode": 401
}/Server/IP to support IPv6. In versions prior to v0.15.0, only one /Server/IP setting could be specified, but in versions after v0.15.1, multiple settings can be specified. That is, if you add an /Server/IP element for IPv6 to the existing configuration as follows, you can accept IPv6 requests from clients:Authorization: Basic {credentials}
# Authorization
Credentials for HTTP Basic Authentication created with <AccessToken>Content-Type: application/jsonContent-Type: application/jsonWWW-Authenticate: Basic realm=”OvenMediaEngine”{
"message": "[HTTP] Could not find the virtual host: [default1] (404)",
"statusCode": 404
}Authorization: Basic {credentials}
# Authorization
Credentials for HTTP Basic Authentication created with <AccessToken>Content-Type: application/jsonWWW-Authenticate: Basic realm=”OvenMediaEngine”{
"message": "[HTTP] Could not find the application: [default/app2] (404)",
"statusCode": 404
}Authorization: Basic {credentials}
# Authorization
Credentials for HTTP Basic Authentication created with <AccessToken>Content-Type: application/json{
"message": "[HTTP] Cannot change [name] using this API (400)",
"statusCode": 400
}WWW-Authenticate: Basic realm=”OvenMediaEngine”{
"message": "[HTTP] Could not find the application: [default/app2] (404)",
"statusCode": 404
}Authorization: Basic {credentials}
# Authorization
Credentials for HTTP Basic Authentication created with <AccessToken>Content-Type: application/jsonWWW-Authenticate: Basic realm=”OvenMediaEngine”{
"message": "[HTTP] Could not find the application: [default/app2] (404)",
"statusCode": 404
}{
"message": "[HTTP] Internal Server Error (500)",
"statusCode": 500
}<Server>
...
<IP>*</IP>
<!-- Listening the bind ports on IPv6 interfaces -->
<IP>::</IP>
...<Server version="8">
<Name>OvenMediaEngine</Name>
<Type>origin</Type>
<IP>*</IP>
<Bind>
<Providers>
<RTMP>
<Port>1935</Port>
</RTMP>
</Providers>
</Bind>
</Server>$ sudo netstat -tulnp | grep "$(pgrep OvenMediaEngine)"
tcp 0 0 0.0.0.0:1935 0.0.0.0:* LISTEN xxx/OvenMediaEn<Server version="8">
<Name>OvenMediaEngine</Name>
<Type>origin</Type>
<IP>::</IP>
<Bind>
<Providers>
<RTMP>
<Port>1935</Port>
</RTMP>
</Providers>
</Bind>
</Server>$ sudo netstat -tulnp | grep "$(pgrep OvenMediaEngine)"
tcp6 0 0 :::1935 :::* LISTEN xxx/OvenMediaEn<?xml version="1.0" encoding="UTF-8"?>
<Server version="8">
<Name>OvenMediaEngine</Name>
<Type>origin</Type>
<IP>*</IP>
<IP>::</IP>
<Bind>
<Providers>
<RTMP>
<Port>1935</Port>
</RTMP>
</Providers>
</Bind>
</Server>
$ sudo netstat -tulnp | grep "$(pgrep OvenMediaEngine)"
tcp 0 0 0.0.0.0:1935 0.0.0.0:* LISTEN xxx/OvenMediaEn
tcp6 0 0 :::1935 :::* LISTEN xxx/OvenMediaEn<Server version="8">
...
<Bind>
<Providers>
<WebRTC>
...
<IceCandidates>
<IceCandidate>*:10000/udp</IceCandidate>
<IceCandidate>[::]:10000/udp</IceCandidate>
</IceCandidates>
...<Server version="8">
...
<VirtualHosts>
<VirtualHost>
<Origins>
<Origin>
<Location>/rtsp/stream</Location>
<Pass>
<Scheme>rtsp</Scheme>
<Urls>
<Url>airen:airen@[1:2:3:4:5:6:7:8]:1234/app/stream</Url>
</Urls>
</Pass>
</Origin>
</Origins>
...<Server version="8">
...
<VirtualHosts>
<VirtualHost>
<AdmissionWebhooks>
<ControlServerUrl>http://[1:2:3:4:5:6:7:8]:7000/a/b/c</ControlServerUrl>{
"statusCode": 200,
"message": "OK",
"response": [
"app",
"app2",
"app3"
]
}
# statusCode
Same as HTTP Status Code
# message
A human-readable description of the response code
# response
Json array containing a list of application names{
"message": "[HTTP] Authorization header is required to call API (401)",
"statusCode": 401
}[
{
"name": "app",
"type": "live",
"outputProfiles": {
"outputProfile": [
{
"name": "default",
"outputStreamName": "${OriginStreamName}",
"encodes": {
"audios": [
{
"name": "opus",
"codec": "opus",
"samplerate": 48000,
"bitrate": 128000,
"channel": 2,
"bypassIfMatch": {
"codec": "eq"
}
},
{
"name": "aac",
"codec": "aac",
"samplerate": 48000,
"bitrate": 128000,
"channel": 2,
"bypassIfMatch": {
"codec": "eq"
}
}
],
"videos": [
{
"name": "bypass_video",
"bypass": true
}
]
}
}
]
},
"providers": {
"ovt": {},
"rtmp": {},
"rtspPull": {},
"srt": {},
"webrtc": {}
},
"publishers": {
"llhls": {},
"ovt": {},
"webrtc": {}
}
}
]
# name (required)
Application name to create
# type (required)
live - currently only support live
# outputProfiles (optional)
Set OutputProfile for Transcoding. See the ABR and Transcoding chapter for more details. If no outputProfiles are present in the request, a default outputProfile as above is configured.
# providers (optional)
Configure providers. See the Live Source chapter for details. If providers are not present in the request, they are configured with default providers as above.
# publishers (optional)
Configure publishers. See the Streaming chapter for details. If publishers are not present in the request, they are configured with default publishers as above.[
{
"statusCode": 200,
"message": "OK",
"response": {
"name": "app",
"outputProfiles": {
...
"providers": {
"ovt": {},
"rtmp": {},
...
},
{
"statusCode": 200,
"message": "OK",
"response": {
...
}
}
}
# statusCode
Same as HTTP Status Code
# message
A human-readable description of the response code
# response
Created application information[
{
"statusCode": 200,
"message": "OK",
"response": {
"name": "app",
"outputProfiles": {
...
"providers": {
"ovt": {},
"rtmp": {},
...
},
{
"statusCode": 409,
"message": "Conflict",
"response": {
...
}
}
}
# statusCode
Same as HTTP Status Code
# message
A human-readable description of the response code
# response
Application information created when statusCode is 200{
"message": "[HTTP] Authorization header is required to call API (401)",
"statusCode": 401
}{
"statusCode": 200,
"message": "OK",
"response": {
"dynamic": false,
"name": "app",
"type": "live",
"outputProfiles": {
"outputProfile": [
{
"encodes": {
"audios": [
{
"bitrate": 128000,
"bypassIfMatch": {
"codec": "eq"
},
"channel": 2,
"codec": "opus",
"name": "opus",
"samplerate": 48000
},
{
"bitrate": 128000,
"bypassIfMatch": {
"codec": "eq"
},
"channel": 2,
"codec": "aac",
"name": "aac",
"samplerate": 48000
}
],
"videos": [
{
"bypass": true,
"name": "bypass_video"
}
]
},
"name": "bypass",
"outputStreamName": "${OriginStreamName}"
}
]
},
"providers": {
"ovt": {},
"rtmp": {},
"rtspPull": {},
"srt": {},
"webrtc": {}
},
"publishers": {
"llhls": {},
"ovt": {},
"webrtc": {}
}
}
}
# statusCode
Same as HTTP Status Code
# message
A human-readable description of the response code
# response
Application information{
"message": "[HTTP] Authorization header is required to call API (401)",
"statusCode": 401
}{
"providers": {
"webrtc": {
"timeout": 60000
}
}
}{
"statusCode": 200,
"message": "OK",
"response": {
"dynamic": false,
"name": "app",
"type": "live",
"outputProfiles": {
"outputProfile": [
{
"encodes": {
"audios": [
{
"bitrate": 128000,
"bypassIfMatch": {
"codec": "eq"
},
"channel": 2,
"codec": "opus",
"name": "opus",
"samplerate": 48000
},
{
"bitrate": 128000,
"bypassIfMatch": {
"codec": "eq"
},
"channel": 2,
"codec": "aac",
"name": "aac",
"samplerate": 48000
}
],
"videos": [
{
"bypass": true,
"name": "bypass_video"
}
]
},
"name": "bypass",
"outputStreamName": "${OriginStreamName}"
}
]
},
"providers": {
"ovt": {},
"rtmp": {},
"rtspPull": {},
"srt": {},
"webrtc": {
"timeout": 60000
}
},
"publishers": {
"llhls": {},
"ovt": {},
"webrtc": {}
}
}
}
# statusCode
Same as HTTP Status Code
# message
A human-readable description of the response code
# response
Mofified application information{
"message": "[HTTP] Authorization header is required to call API (401)",
"statusCode": 401
}{
"message": "OK",
"statusCode": 200
}
# statusCode
Same as HTTP Status Code
# message
A human-readable description of the response code{
"message": "[HTTP] Authorization header is required to call API (401)",
"statusCode": 401
}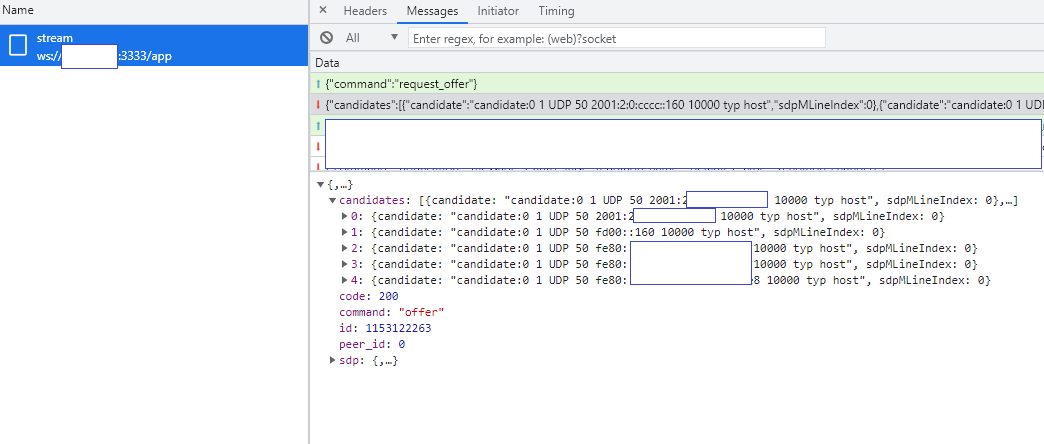
/usr/share/ovenmediaengine/conf/Server.xml/<OvenMediaEngine Binary Path>/conf/Server.xml# For Origin mode
/opt/ovenmediaengine/bin/origin_conf/Server.xml
# For Edge mode
/opt/ovenmediaengine/bin/edge_conf/Server.xml<?xml version="1.0" encoding="UTF-8"?>
<Server version="8">
<Name>OvenMediaEngine</Name>
<IP>*</IP>
<PrivacyProtection>false</PrivacyProtection>
<StunServer>stun.l.google.com:19302</StunServer>
<Bind>...</Bind>
<VirtualHosts>...</VirtualHosts>
</Server> <IP>*</IP><StunServer>stun.l.google.com:19302</StunServer><!-- Settings for the ports to bind -->
<Bind>
<!-- Enable this configuration if you want to use API Server -->
<!--
<Managers>
<API>
<Port>8081</Port>
<WorkerCount>1</WorkerCount>
</API>
</Managers>
-->
<Providers>
<!-- Pull providers -->
<RTSPC>
<WorkerCount>1</WorkerCount>
</RTSPC>
<OVT>
<WorkerCount>1</WorkerCount>
</OVT>
<!-- Push providers -->
<RTMP>
<Port>1935</Port>
<WorkerCount>1</WorkerCount>
</RTMP>
<SRT>
<Port>9999</Port>
<WorkerCount>1</WorkerCount>
</SRT>
<MPEGTS>
<!--
Listen on port 4000~4005 (<Port>4000-4004,4005/udp</Port>)
This is just a demonstration to show that you can configure the port in several ways
-->
<Port>4000/udp</Port>
</MPEGTS>
<WebRTC>
<Signalling>
<Port>3333</Port>
<TLSPort>3334</TLSPort>
<WorkerCount>1</WorkerCount>
</Signalling>
<IceCandidates>
<IceCandidate>*:10000/udp</IceCandidate>
<!--
If you want to stream WebRTC over TCP, specify IP:Port for TURN server.
This uses the TURN protocol, which delivers the stream from the built-in TURN server to the player's TURN client over TCP.
For detailed information, refer https://airensoft.gitbook.io/ovenmediaengine/streaming/webrtc-publishing#webrtc-over-tcp
-->
<TcpRelay>*:3478</TcpRelay>
<!-- TcpForce is an option to force the use of TCP rather than UDP in WebRTC streaming. (You can omit ?transport=tcp accordingly.) If <TcpRelay> is not set, playback may fail. -->
<TcpForce>true</TcpForce>
<TcpRelayWorkerCount>1</TcpRelayWorkerCount>
</IceCandidates>
</WebRTC>
</Providers>
<Publishers>
<OVT>
<Port>9000</Port>
<WorkerCount>1</WorkerCount>
</OVT>
<LLHLS>
<!--
OME only supports h2, so LLHLS works over HTTP/1.1 on non-TLS ports.
LLHLS works with higher performance over HTTP/2,
so it is recommended to use a TLS port.
-->
<Port>3333</Port>
<!-- If you want to use TLS, specify the TLS port -->
<TLSPort>3334</TLSPort>
<WorkerCount>1</WorkerCount>
</LLHLS>
<WebRTC>
<Signalling>
<Port>3333</Port>
<TLSPort>3334</TLSPort>
<WorkerCount>1</WorkerCount>
</Signalling>
<IceCandidates>
<IceCandidate>*:10000-10005/udp</IceCandidate>
<!--
If you want to stream WebRTC over TCP, specify IP:Port for TURN server.
This uses the TURN protocol, which delivers the stream from the built-in TURN server to the player's TURN client over TCP.
For detailed information, refer https://airensoft.gitbook.io/ovenmediaengine/streaming/webrtc-publishing#webrtc-over-tcp
-->
<TcpRelay>*:3478</TcpRelay>
<!-- TcpForce is an option to force the use of TCP rather than UDP in WebRTC streaming. (You can omit ?transport=tcp accordingly.) If <TcpRelay> is not set, playback may fail. -->
<TcpForce>true</TcpForce>
<TcpRelayWorkerCount>1</TcpRelayWorkerCount>
</IceCandidates>
</WebRTC>
</Publishers>
</Bind><?xml version="1.0" encoding="UTF-8"?>
<Server version="8">
<Name>OvenMediaEngine</Name>
<VirtualHosts>
<VirtualHost>
<Name>default</Name>
<Host>
...
</Host>
<Origins>
...
</Origins>
<SignedPolicy>
...
</SignedPolicy>
<Applications>
...
</Applications>
</Host>
</Hosts>
</Server><Host>
<Names>
<!-- Domain names
<Name>stream1.airensoft.com</Name>
<Name>stream2.airensoft.com</Name>
<Name>*.sub.airensoft.com</Name>
-->
<Name>*</Name>
</Names>
<TLS>
<CertPath>path/to/file.crt</CertPath>
<KeyPath>path/to/file.key</KeyPath>
<ChainCertPath>path/to/file.crt</ChainCertPath>
</TLS>
</Host><Origins>
<Origin>
<Location>/app/stream</Location>
<Pass>
<Scheme>ovt</Scheme>
<Urls><Url>origin.com:9000/app/stream_720p</Url></Urls>
</Pass>
</Origin>
<Origin>
<Location>/app/</Location>
<Pass>
<Scheme>ovt</Scheme>
<Urls><Url>origin.com:9000/app/</Url></Urls>
</Pass>
</Origin>
<Origin>
<Location>/rtsp/stream</Location>
<Pass>
<Scheme>rtsp</Scheme>
<Urls><Url>rtsp-server.com:554/</Url></Urls>
</Pass>
</Origin>
<Origin>
<Location>/</Location>
<Pass>
<Scheme>ovt</Scheme>
<Urls><Url>origin2.com:9000/</Url></Urls>
</Pass>
</Origin>
</Origins><VirtualHost>
...
<Applications>
<Application>
...
</Application>
<Application>
...
</Application>
</Applications>
</VirtualHost><Application>
<Name>app</Name>
<Type>live</Type>
<OutputProfiles> ... </OutputProfiles>
<Providers> ... </Providers>
<Publishers> ... </Publishers>
</Application><Application>
<OutputProfiles>
<OutputProfile>
<Name>bypass_stream</Name>
<OutputStreamName>${OriginStreamName}</OutputStreamName>
<Encodes>
<Audio>
<Bypass>true</Bypass>
</Audio>
<Video>
<Bypass>true</Bypass>
</Video>
<Audio>
<Codec>opus</Codec>
<Bitrate>128000</Bitrate>
<Samplerate>48000</Samplerate>
<Channel>2</Channel>
</Audio>
<!--
<Video>
<Codec>vp8</Codec>
<Bitrate>1024000</Bitrate>
<Framerate>30</Framerate>
<Width>1280</Width>
<Height>720</Height>
</Video>
-->
</Encodes>
</OutputProfile>
</OutputProfiles>
</Application><Application>
<Providers>
<RTMP/>
<WebRTC/>
<SRT/>
<RTSPPull/>
<OVT/>
<MPEGTS>
<StreamMap>
...
</StreamMap>
</MPEGTS>
</Providers>
</Application><Application>
<Publishers>
<OVT />
<LLHLS />
<WebRTC />
</Publishers>
</Application><?xml version="1.0" encoding="UTF-8"?>
<Server version="8">
<Name>OvenMediaEngine</Name>
<!-- Host type (origin/edge) -->
<Type>origin</Type>
<!-- Specify IP address to bind (* means all IPs) -->
<IP>*</IP>
<PrivacyProtection>false</PrivacyProtection>
<!--
To get the public IP address(mapped address of stun) of the local server.
This is useful when OME cannot obtain a public IP from an interface, such as AWS or docker environment.
If this is successful, you can use ${PublicIP} in your settings.
-->
<StunServer>stun.l.google.com:19302</StunServer>
<Modules>
<!--
Currently OME only supports h2 like all browsers do. Therefore, HTTP/2 only works on TLS ports.
-->
<HTTP2>
<Enable>true</Enable>
</HTTP2>
<LLHLS>
<Enable>true</Enable>
</LLHLS>
<!-- P2P works only in WebRTC and is experiment feature -->
<P2P>
<!-- disabled by default -->
<Enable>false</Enable>
<MaxClientPeersPerHostPeer>2</MaxClientPeersPerHostPeer>
</P2P>
</Modules>
<!-- Settings for the ports to bind -->
<Bind>
<!-- Enable this configuration if you want to use API Server -->
<!--
<Managers>
<API>
<Port>8081</Port>
<TLSPort>8082</TLSPort>
<WorkerCount>1</WorkerCount>
</API>
</Managers>
-->
<Providers>
<!-- Pull providers -->
<RTSPC>
<WorkerCount>1</WorkerCount>
</RTSPC>
<OVT>
<WorkerCount>1</WorkerCount>
</OVT>
<!-- Push providers -->
<RTMP>
<Port>1935</Port>
<WorkerCount>1</WorkerCount>
</RTMP>
<SRT>
<Port>9999</Port>
<WorkerCount>1</WorkerCount>
</SRT>
<MPEGTS>
<!--
Listen on port 4000~4005 (<Port>4000-4004,4005/udp</Port>)
This is just a demonstration to show that you can configure the port in several ways
-->
<Port>4000/udp</Port>
</MPEGTS>
<WebRTC>
<Signalling>
<Port>3333</Port>
<TLSPort>3334</TLSPort>
<WorkerCount>1</WorkerCount>
</Signalling>
<IceCandidates>
<IceCandidate>*:10000/udp</IceCandidate>
<!--
If you want to stream WebRTC over TCP, specify IP:Port for TURN server.
This uses the TURN protocol, which delivers the stream from the built-in TURN server to the player's TURN client over TCP.
For detailed information, refer https://airensoft.gitbook.io/ovenmediaengine/streaming/webrtc-publishing#webrtc-over-tcp
-->
<TcpRelay>*:3478</TcpRelay>
<!-- TcpForce is an option to force the use of TCP rather than UDP in WebRTC streaming. (You can omit ?transport=tcp accordingly.) If <TcpRelay> is not set, playback may fail. -->
<TcpForce>true</TcpForce>
<TcpRelayWorkerCount>1</TcpRelayWorkerCount>
</IceCandidates>
</WebRTC>
</Providers>
<Publishers>
<OVT>
<Port>9000</Port>
<WorkerCount>1</WorkerCount>
</OVT>
<LLHLS>
<!--
OME only supports h2, so LLHLS works over HTTP/1.1 on non-TLS ports.
LLHLS works with higher performance over HTTP/2,
so it is recommended to use a TLS port.
-->
<Port>3333</Port>
<!-- If you want to use TLS, specify the TLS port -->
<TLSPort>3334</TLSPort>
<WorkerCount>1</WorkerCount>
</LLHLS>
<WebRTC>
<Signalling>
<Port>3333</Port>
<TLSPort>3334</TLSPort>
<WorkerCount>1</WorkerCount>
</Signalling>
<IceCandidates>
<IceCandidate>*:10000-10005/udp</IceCandidate>
<!--
If you want to stream WebRTC over TCP, specify IP:Port for TURN server.
This uses the TURN protocol, which delivers the stream from the built-in TURN server to the player's TURN client over TCP.
For detailed information, refer https://airensoft.gitbook.io/ovenmediaengine/streaming/webrtc-publishing#webrtc-over-tcp
-->
<TcpRelay>*:3478</TcpRelay>
<!-- TcpForce is an option to force the use of TCP rather than UDP in WebRTC streaming. (You can omit ?transport=tcp accordingly.) If <TcpRelay> is not set, playback may fail. -->
<TcpForce>true</TcpForce>
<TcpRelayWorkerCount>1</TcpRelayWorkerCount>
</IceCandidates>
</WebRTC>
</Publishers>
</Bind>
<!--
Enable this configuration if you want to use API Server
<AccessToken> is a token for authentication, and when you invoke the API, you must put "Basic base64encode(<AccessToken>)" in the "Authorization" header of HTTP request.
For example, if you set <AccessToken> to "ome-access-token", you must set "Basic b21lLWFjY2Vzcy10b2tlbg==" in the "Authorization" header.
-->
<!--
<Managers>
<Host>
<Names>
<Name>*</Name>
</Names>
<TLS>
<CertPath>path/to/file.crt</CertPath>
<KeyPath>path/to/file.key</KeyPath>
<ChainCertPath>path/to/file.crt</ChainCertPath>
</TLS>
</Host>
<API>
<AccessToken>ome-access-token</AccessToken>
<CrossDomains>
<Url>*.airensoft.com</Url>
<Url>http://*.sub-domain.airensoft.com</Url>
<Url>http?://airensoft.*</Url>
</CrossDomains>
</API>
</Managers>
-->
<VirtualHosts>
<!-- You can use wildcard like this to include multiple XMLs -->
<VirtualHost include="VHost*.xml" />
<VirtualHost>
<Name>default</Name>
<!--Distribution is a value that can be used when grouping the same vhost distributed across multiple servers. This value is output to the events log, so you can use it to aggregate statistics. -->
<Distribution>ovenmediaengine.com</Distribution>
<!-- Settings for multi ip/domain and TLS -->
<Host>
<Names>
<!-- Host names
<Name>stream1.airensoft.com</Name>
<Name>stream2.airensoft.com</Name>
<Name>*.sub.airensoft.com</Name>
<Name>192.168.0.1</Name>
-->
<Name>*</Name>
</Names>
<!--
<TLS>
<CertPath>path/to/file.crt</CertPath>
<KeyPath>path/to/file.key</KeyPath>
<ChainCertPath>path/to/file.crt</ChainCertPath>
</TLS>
-->
</Host>
<!--
Refer https://airensoft.gitbook.io/ovenmediaengine/signedpolicy
<SignedPolicy>
<PolicyQueryKeyName>policy</PolicyQueryKeyName>
<SignatureQueryKeyName>signature</SignatureQueryKeyName>
<SecretKey>aKq#1kj</SecretKey>
<Enables>
<Providers>rtmp,webrtc,srt</Providers>
<Publishers>webrtc,llhls</Publishers>
</Enables>
</SignedPolicy>
-->
<!--
<AdmissionWebhooks>
<ControlServerUrl></ControlServerUrl>
<SecretKey></SecretKey>
<Timeout>3000</Timeout>
<Enables>
<Providers>rtmp,webrtc,srt</Providers>
<Publishers>webrtc,llhls</Publishers>
</Enables>
</AdmissionWebhooks>
-->
<!-- <Origins>
<Properties>
<NoInputFailoverTimeout>3000</NoInputFailoverTimeout>
<UnusedStreamDeletionTimeout>60000</UnusedStreamDeletionTimeout>
</Properties>
<Origin>
<Location>/app/stream</Location>
<Pass>
<Scheme>ovt</Scheme>
<Urls><Url>origin.com:9000/app/stream_720p</Url></Urls>
</Pass>
<ForwardQueryParams>false</ForwardQueryParams>
</Origin>
<Origin>
<Location>/app/</Location>
<Pass>
<Scheme>ovt</Scheme>
<Urls><Url>origin.com:9000/app/</Url></Urls>
</Pass>
</Origin>
<Origin>
<Location>/edge/</Location>
<Pass>
<Scheme>ovt</Scheme>
<Urls><Url>origin.com:9000/app/</Url></Urls>
</Pass>
</Origin>
</Origins> -->
<!-- Settings for applications -->
<Applications>
<Application>
<Name>app</Name>
<!-- Application type (live/vod) -->
<Type>live</Type>
<OutputProfiles>
<!-- Enable this configuration if you want to hardware acceleration using GPU -->
<HardwareAcceleration>false</HardwareAcceleration>
<OutputProfile>
<Name>bypass_stream</Name>
<OutputStreamName>${OriginStreamName}</OutputStreamName>
<Encodes>
<Audio>
<Bypass>true</Bypass>
</Audio>
<Video>
<Bypass>true</Bypass>
</Video>
<Audio>
<Codec>opus</Codec>
<Bitrate>128000</Bitrate>
<Samplerate>48000</Samplerate>
<Channel>2</Channel>
</Audio>
<!--
<Video>
<Codec>vp8</Codec>
<Bitrate>1024000</Bitrate>
<Framerate>30</Framerate>
<Width>1280</Width>
<Height>720</Height>
<Preset>faster</Preset>
</Video>
-->
</Encodes>
</OutputProfile>
</OutputProfiles>
<Providers>
<OVT />
<WebRTC />
<RTMP />
<SRT />
<MPEGTS>
<StreamMap>
<!--
Set the stream name of the client connected to the port to "stream_${Port}"
For example, if a client connects to port 4000, OME creates a "stream_4000" stream
<Stream>
<Name>stream_${Port}</Name>
<Port>4000,4001-4004</Port>
</Stream>
<Stream>
<Name>stream_4005</Name>
<Port>4005</Port>
</Stream>
-->
<Stream>
<Name>stream_${Port}</Name>
<Port>4000</Port>
</Stream>
</StreamMap>
</MPEGTS>
<RTSPPull />
<WebRTC>
<Timeout>30000</Timeout>
</WebRTC>
</Providers>
<Publishers>
<AppWorkerCount>1</AppWorkerCount>
<StreamWorkerCount>8</StreamWorkerCount>
<OVT />
<WebRTC>
<Timeout>30000</Timeout>
<Rtx>false</Rtx>
<Ulpfec>false</Ulpfec>
<JitterBuffer>false</JitterBuffer>
</WebRTC>
<LLHLS>
<ChunkDuration>0.2</ChunkDuration>
<SegmentDuration>6</SegmentDuration>
<SegmentCount>10</SegmentCount>
<CrossDomains>
<Url>*</Url>
</CrossDomains>
</LLHLS>
</Publishers>
</Application>
</Applications>
</VirtualHost>
</VirtualHosts>
</Server>
HLS http://192.168.0.1:8080/app/stream_bypass/ts:playlist.m3u8<OutputProfiles>
<!--
Common setting for decoders. Decodes is optional.
<Decodes>
Number of threads for the decoder.
<ThreadCount>2</ThreadCount>
By default, OME decodes all video frames. If OnlyKeyframes is true, only the keyframes will be decoded, massively improving thumbnail performance at the cost of having less control over when exactly they are generated
<OnlyKeyframes>false</OnlyKeyframes>
</Decodes>
-->
<OutputProfile>
<Name>bypass_stream</Name>
<OutputStreamName>${OriginStreamName}_bypass</OutputStreamName>
<Encodes>
<Video>
<Bypass>true</Bypass>
</Video>
<Audio>
<Bypass>true</Bypass>
</Audio>
<Audio>
<Codec>opus</Codec>
<Bitrate>128000</Bitrate>
<Samplerate>48000</Samplerate>
<Channel>2</Channel>
</Audio>
</Encodes>
</OutputProfile>
</OutputProfiles><Encodes>
<Video>
<Name>h264_hd</Name>
<Codec>h264</Codec>
<Width>1280</Width>
<Height>720</Height>
<Bitrate>2000000</Bitrate>
<Framerate>30.0</Framerate>
<KeyFrameInterval>30</KeyFrameInterval>
<BFrames>0</BFrames>
<Preset>fast</Preset>
<ThreadCount>4</ThreadCount>
</Video>
</Encodes><Encodes>
<Audio>
<Name>opus_128</Name>
<Codec>opus</Codec>
<Bitrate>128000</Bitrate>
<Samplerate>48000</Samplerate>
<Channel>2</Channel>
</Audio>
</Encodes><Encodes>
<Image>
<Codec>jpeg</Codec>
<Width>1280</Width>
<Height>720</Height>
<Framerate>1</Framerate>
</Image>
</Encodes><Video>
<Bypass>true</Bypass>
</Video>
<Audio>
<Bypass>true</Bypass>
</Audio><Encodes>
<Video>
<Bypass>true</Bypass>
</Video>
<Audio>
<Codec>opus</Codec>
<Bitrate>128000</Bitrate>
<Samplerate>48000</Samplerate>
<Channel>2</Channel>
</Audio>
</Encodes><Encodes>
<Video>
<Bypass>true</Bypass>
</Video>
<Audio>
<Name>cond_audio_aac</Name>
<Codec>aac</Codec>
<Bitrate>128000</Bitrate>
<Samplerate>48000</Samplerate>
<Channel>2</Channel>
<BypassIfMatch>
<Codec>eq</Codec>
<Samplerate>lte</Samplerate>
<Channel>eq</Channel>
</BypassIfMatch>
</Audio>
<Audio>
<Name>cond_audio_opus</Name>
<Codec>opus</Codec>
<Bitrate>128000</Bitrate>
<Samplerate>48000</Samplerate>
<Channel>2</Channel>
<BypassIfMatch>
<Codec>eq</Codec>
<Samplerate>lte</Samplerate>
<Channel>eq</Channel>
</BypassIfMatch>
</Audio>
</Encodes><Encodes>
<Video>
<Name>prevent_upscaling_video</Name>
<Codec>h264</Codec>
<Bitrate>2048000</Bitrate>
<Width>1280</Width>
<Height>720</Height>
<Framerate>30</Framerate>
<BypassIfMatch>
<Codec>eq</Codec>
<Width>lte</Width>
<Height>lte</Height>
<SAR>eq</SAR>
</BypassIfMatch>
</Video>
</Encodes><Encodes>
<Video>
<Codec>vp8</Codec>
<Bitrate>2000000</Bitrate>
</Video>
<Audio>
<Codec>opus</Codec>
<Bitrate>128000</Bitrate>
</Audio>
<Image>
<Codec>jpeg</Codec>
</Image>
</Encodes><Encodes>
<Video>
<Codec>h264</Codec>
<Bitrate>2000000</Bitrate>
<Width>1280</Width>
<!-- Height is automatically calculated as the original video ratio -->
<Framerate>30.0</Framerate>
</Video>
<Video>
<Codec>h264</Codec>
<Bitrate>2000000</Bitrate>
<!-- Width is automatically calculated as the original video ratio -->
<Height>720</Height>
<Framerate>30.0</Framerate>
</Video>
</Encodes><OutputProfiles>
<!--
Common setting for decoders. Decodes is optional.
-->
<Decodes>
<!-- Number of threads for the decoder.-->
<ThreadCount>2</ThreadCount>
</Decodes>
<OutputProfile>
....
</OutputProfile>
</OutputProfiles><OutputProfiles>
<!-- Common setting for decoders. Decodes is optional. -->
<Decodes>
<!--
By default, OME decodes all video frames.
With OnlyKeyframes, only keyframes are decoded,
massively improving performance.
Thumbnails are generated only on keyframes,
they may not generate at your requested fps!
-->
<OnlyKeyframes>true</OnlyKeyframes>
</Decodes>
<OutputProfile>
<Encodes>
<Video>
<Bypass>true</Bypass>
</Video>
<Image>
<Codec>jpeg</Codec>
<Width>1280</Width>
<Height>720</Height>
<Framerate>1</Framerate>
</Image>
</Encodes>
</OutputProfile>
</OutputProfiles><OutputProfile>
<Name>bypass_stream</Name>
<OutputStreamName>${OriginStreamName}</OutputStreamName>
<!--LLHLS URL : https://domain/app/stream/abr.m3u8 -->
<Playlist>
<Name>For LLHLS</Name>
<FileName>abr</FileName>
<Options> <!-- Optinal -->
<!--
Automatically switch rendition in WebRTC ABR
[Default] : true
-->
<WebRtcAutoAbr>true</WebRtcAutoAbr>
<EnableTsPackaging>true</EnableTsPackaging>
</Options>
<Rendition>
<Name>Bypass</Name>
<Video>bypass_video</Video>
<Audio>bypass_audio</Audio>
</Rendition>
<Rendition>
<Name>FHD</Name>
<Video>video_1280</Video>
<Audio>bypass_audio</Audio>
</Rendition>
<Rendition>
<Name>HD</Name>
<Video>video_720</Video>
<Audio>bypass_audio</Audio>
</Rendition>
</Playlist>
<!--LLHLS URL : https://domain/app/stream/llhls.m3u8 -->
<Playlist>
<Name>Change Default</Name>
<FileName>llhls</FileName>
<Rendition>
<Name>HD</Name>
<Video>video_720</Video>
<Audio>bypass_audio</Audio>
</Rendition>
</Playlist>
<Encodes>
<Audio>
<Name>bypass_audio</Name>
<Bypass>true</Bypass>
</Audio>
<Video>
<Name>bypass_video</Name>
<Bypass>true</Bypass>
</Video>
<Audio>
<Codec>opus</Codec>
<Bitrate>128000</Bitrate>
<Samplerate>48000</Samplerate>
<Channel>2</Channel>
</Audio>
<Video>
<Name>video_1280</Name>
<Codec>h264</Codec>
<Bitrate>5024000</Bitrate>
<Framerate>30</Framerate>
<Width>1920</Width>
<Height>1280</Height>
<Preset>faster</Preset>
</Video>
<Video>
<Name>video_720</Name>
<Codec>h264</Codec>
<Bitrate>2024000</Bitrate>
<Framerate>30</Framerate>
<Width>1280</Width>
<Height>720</Height>
<Preset>faster</Preset>
</Video>
</Encodes>
</OutputProfile>